 |
| Not as groovy as it once was |
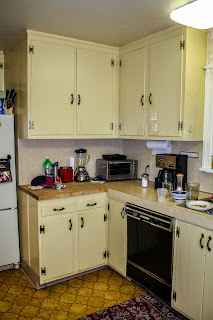
I remember walking through the house during our inspection day with my iPhone taking a video. I was making a video tour of the house to post to my YouTube channel so my parents could see the house. On the video you can hear me tell the listeners - so far the house has looked very good....until you walk through this door. Behind that door was the bulter's pantry, breakfast nook and kitchen. Everything was just so ugly. Don't get me wrong...I'm sure Greg, Marsha, Peter, Jan, Bobby and Cindy would have thought it was groovy back in the 70's...but it was not up to 2015 standards (or the 80's or 90's for that matter).
Everything in the kitchen was in need of help. So far I have:
- Rehabbed the kitchen floors...including linoleum removal and restoring the wide plank pine floors
- Replaced the gross stove and built a great new range shelf and
- Removed the hideous wallpaper, painted and changed the light fixtures.
Kitchens take a long time. I have been working on the kitchen for 5+ months (over the past 14 months)...and there was just one more area I wanted to refinish during this stage of the kitchen renovation - the cabinets.
Refacing Kitchen Cabinets...reusing the originals
Step 1 - Take Before Pictures
Step 2 - Make a Plan
There were 18 cabinets plus 7 drawers. Do to space constraints in my workshop - I divided the kitchen into 3 sections. Therefore every step you see below was actually done three separate times...did I mention? Kitchens take a long time!
Step 3 - Remove the Cabinet Doors
Number all the doors before you take them off the cabinets with a
Post It so you know which order you took them off in and what order to
put them back up in.
 Enlist good help...lucky for me good help is NOT hard to find - My Little Helper never disappoints.
Step 4 - Remove the old hardware
Step 5 - Sand and Wipe
Sand the naked doors then wipe the dust off with a tack cloth
Step 6 - Measure & Cut
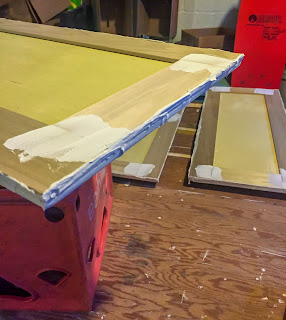
I used 1/4" x 3" pieces of poplar, cut to size, to frame out the doors to create the illusion of a recessed panel.
Step 7 - Glue and Clamp

In this pictures you can see my new favorite glue. Up to this point I had always used Elmer's, but then I saw Tom Silva using Titebond II Premium Wood Glue on This Old House. I have learned so much from Tom Silva over the years...and he did not disappoint. This glue is just better...and the round hot dog stand ketchup style bottle is much more ergonomically correct for squeezing over and over again...
Step 8 - Sand, Wipe & Paint the Cabinet Boxes
 While the wood glue was drying on the cabinet doors, I sanded the cabinet boxes. I followed that with wiping the dust off with a tack cloth, then painting them with the same Benjamin Moore White Dove paint I used on all the trim work. I then protected all the tops of the shelves with MinWax Polycrylic. Again it is a water-based clear coat for white finishes. Remember polyurethane will add an amber shade to any project...so don't use polyurethane on anything you want to be white!
Step 9 - Add Baseboard Trim
Ok so this step really has nothing to do with refacing your cabinets....but I also took the opportunity to add some matching baseboard trim to the cabinets ends to match the rest of the walls. Note: it is easier to pre-paint the baseboards and any quarter-round trim prior to cutting and installing. Then just touch up any necessary areas after installation.

 | |
| The proper way to end a piece of baseboard |
Most of the time your baseboard will end at a door frame or a inside or
outside corner - in which case you will just need to miter the baseboard.
However, it doesn't happen often, but in case this ever comes up - there is really only one proper way to end a piece of baseboard in the middle of a wall (or cabinet in my case).
You want to cut a piece to fit into the end that you can glue into place so there is no end grain showing. See the picture to the right. I could write the steps, but seeing is much easier. Here is a video I found that shows you the process.
Step 10 - Don't forget the Drawers
 I was not changing the face of the drawers, because the new drawer pulls (see the After Pictures) will add enough interest and be the focal point of the drawers. However I did have one drawer that needed some reconstructive surgery.
As you can see this drawer was missing a major section of the lower center and right. I built a form around the drawer with some sections of wood covered in packing tape. I then used a Wood Filler. Note there is a difference between Wood Putty and Wood Filler. Wood Putty is for just filling small nail holes or indentations in a wood surface. A wood filler has the structural strength capable of rebuilding the wood. I used MinWax High Performance Wood Filler. The packing tape I mentioned above was used to keep the wood filler from adhering to the form I made. After the filler dried I was able to sand it to shape, then paint. Good as new.
Step 11 - Spackle
 In order to hide the fact that the 1/4" trim boards were glued on top of the existing cabinet doors, I used joint compound along the 4 edges of each cabinet. Then I sanded everything smooth with my orbital sander with 220 grit.
Step 12 - Paint the Cabinet Doors
Painting the cabinet doors was a another monotonous job by itself. Each door had to be painted 6 times which included 13 steps!...and remember I had 18 doors (plus 7 drawers). That is 108 door sides I painted - how many things can you think of that you want to do 108 times!...and that is just the cabinet doors!
Painting the cabinet doors was a another monotonous job by itself. Each door had to be painted 6 times which included 13 steps!...and remember I had 18 doors (plus 7 drawers). That is 108 door sides I painted - how many things can you think of that you want to do 108 times!...and that is just the cabinet doors!
- Prime the back of cabinet door (#1)
- Flip over & prime front of the door (#2)
- Sand both sides
- Wipe of dust with tack cloth
- Paint coat 1 of the back (#3)
- Sand
- Wipe off dust
- Paint coat 2 of the back (#4)
- Wait to dry for a full day or more (cure)
- Flip over and paint coat 1 of the front (#5)
- Sand
- Wipe off dust
- Paint coat 2 of the front (#6)

Of course it took me until my last 5 doors to get smart. Thats when I finally raised the cabinets onto boxes. It was easier because I had to bend over less, plus I could paint all 4 edges without having to lift up the door.
Note 1: when painting the edges I always had to wipe the underside of the door to remove any extra paint that overlapped onto the bottom - this way I wouldn't end up with some unsightly overlap lines. I wore rubber gloves and wiped the paint onto my pants. I started out using rags, but it was just easier to use my pants. Those pants could now stand on their own...literally because they are so stiff from the dried paint!
Note 2: I
used Benjamin Moore's ADVANCE Waterborne Interior Alkyd Paint. It self levels much better to a smooth finish. Brush strokes are barely noticeable
Note 3: Talking about brushes...buy a good brush - expect to pay $14-$18 for a 2.5" angle brush. A cheap brush will ruin your paint job, no matter the brand of paint...and if you are going to spend the money on B.Moore paint - you obviously care about the finished product so don't ruin it by using a cheap brush. FYI if taken care of properly you can us the same brush for multiple projects.
Note 3: Talking about brushes...buy a good brush - expect to pay $14-$18 for a 2.5" angle brush. A cheap brush will ruin your paint job, no matter the brand of paint...and if you are going to spend the money on B.Moore paint - you obviously care about the finished product so don't ruin it by using a cheap brush. FYI if taken care of properly you can us the same brush for multiple projects.
Step 13 - Drawer Pulls
The key to nice looking drawer pulls are:
- centered,
- leveled and
- evenly spaced from drawer to drawer.
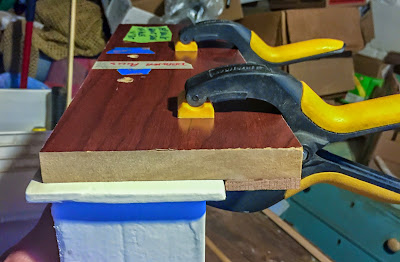
In order to achieve the above you must create a template (well must may be an over exaggeration - but it sure will make your job a hell of a lot easier!). Once your template is perfect - so will be every drawer pull!
Here is how I made and used mine:
 | |
| Make sure the guide lip on the back is level with the your guide holes and the distance between the lip and holes are the desired distance you want the pull to be from the top of the drawer. |
 |
| Make a Center Line (on the tan masking tape) |
 | |||
| Rest the guide lip on top of the top of the drawer, line up the center line on your guide with the center line on your drawer front, then clamp in place. Drill your holes. Perfect every time. |

Step 14 - Hang the Cabinets and Knobs
 Definitely a chore in and of itself. It is not easy to get everything to line up. To make your job easier make sure your new hinges have slotted holes so you can make slight adjustments up and down. You will also need to adjust for plumb. Every style of hinge will require a different process to make sure every door is level and plumb.
As for the knobs - just make sure they are all even and level (on the same plane) with each other.
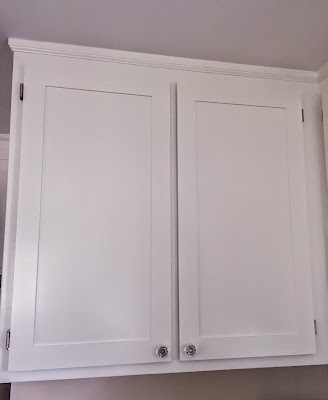
The After Pictures

Side by Side Comparison


So after almost 5 months this stage of the kitchen renovation is finished....the next stage...counter tops will have to wait...wedding season is upon us so Splendid Stems will be very busy these next few months...and we don't even know what material we want yet! (well actually we both know what we want - but we both want a different type of counter top). So wait we will. In the meantime I will start knocking off some other great projects. Stay tuned.


Very intriguing - a lot of labor and a lot of love going into these renovations....great job!!!! Can't wait for the next installment.....
ReplyDeleteI appreciate everything you have added to my knowledge base.Admiring the time and effort you put into your blog and detailed information you offer.Thanks. Windows and Doors Toronto
ReplyDeleteThanks for the post and great tips: even I also think that hard work is the most important aspect of getting success. Remodeling Pearland TX
ReplyDeleteNo doubt this is an excellent post I got a lot of knowledge after reading good luck. Theme of blog is excellent there is almost everything to read, Brilliant post. 3d innovations: home renovation singapore
ReplyDeletePlease continue this great work and I look forward to more of your awesome blog posts. Best Hair Straighteners
ReplyDeleteI felt very happy while reading this site. This was really very informative site for me. I really liked it. This was really a cordial post. Thanks a lot!. Succulent Alley
ReplyDeleteGreat work, Thanks much for the expert Kitchen Renovation blog.
ReplyDeleteThank you very much for this useful article. I like it. kitchen cabinet door replacement
ReplyDeleteKitchen renovation is not a tough job. Because there is no lot space to do it. I am also recently changed my kitchen door and done some small renovation work, now its looking better.
ReplyDeleteThis is a great post. Your Blog the very informative i have learned some information about your blog.
ReplyDeletehttps://www.lcrenovation.co.uk/loft-conversions/
House Renovations in Brixton
Здравствуйте, дамы Простите что поздно, то я делала уход за волосами в том салоне. Отличные мастера, теперь вся довольная и красивая! И недорого! Дамы, рекомендую!
ReplyDeleteПриветствую! Замечательная статья. Благодарю за то, что опубликовали. Последние истории об окнах и дверях из дерева https://svokna-vdnh.1c-umi.ru/. Еще посмотри здесь: домостроительные анонсы кликай., Дешевые окна в дом серии 1605, Деревянные стеклопакеты из сосны в дом серии, подоконники из лиственницы останкино, Деревянные стеклопакеты из дуба в дом серии 1605
ReplyDeleteI think this is an informative post and it is very useful and knowledgeable. therefore, I would like to thank you for the efforts you have made in writing this article.
ReplyDeletehttps://www.lcrenovation.co.uk/renovations-in-vauxhall/
House Renovations in Vauxhall
The first thing you would like to try to to is confirm that they need the proper skills and knowledge in doing the work . Like most of the people , don't assume that a handyman can handle all kinds of repairs and remodeling in your home or office. you'll get a handyman who is sweet in flooring but poor in light carpentry. For the specified results therefore don't run into this assumption.
ReplyDeleteToledo handyman
Are you looking for best Home renovation contractor Singapore? SSH Reno is specializes in providing end to end Remodeling Services for for Residential, Office, Bathroom, Kitchen, Tiles Work, Living Room and other commercial sites. For further information please click ..Tiles contractor singapore & Tiling contractor singapore
ReplyDeleteNice post. Thanks for sharing. Choose the best tile and grout cleaner to make your floor clean and hygienic. We offer countertop, stone, shower, glass and pool tile cleaning products. My work: Grout and Glass restoration products
ReplyDeleteIf you living in BIRMINGHAM and looking for best Plumbing SERVICE IN BIRMINGHAM the you should visit Home Fornt uk because we offer now the best work and services of plumbing in BIRMINGHAM.
ReplyDeleteThis is an awesome post and you have given a great information for the reader...good luck.iBridge Capital is a team of mortgage experts who provide rewarding and dependable mortgage solutions. House mortgage in Kitchner | Best Mortgage Company | Private mortgages Toronto
ReplyDeleteThanks for the wonderful share. Your article has proved your hard work and experience you have got in this field. Brilliant .i love it reading.
ReplyDeletehttps://www.lcrenovation.co.uk/loft-conversions/
House Renovations in Brixton
There is noticeably a lot of money to know about this. I suppose you made particular nice points in functions also. kitchen remodel
ReplyDeleteHi, l cannot tell you how happy l was to find this blog and all the info on your refacing the kitchen, we are on a tight budget from building a shop. My husband asked what l wanted for my milestone b-day l said can we re-do the kitchen cupboards somehow so they look more updated he can do almost anything l looked on pintrest and found this with a chuckle we have the same cupboards and handles. He said l can do that this week we will begin. Thanks so much a dream come true!
ReplyDeleteI'ven read your blog its so intresting and amazing blog it ehance my knowledge and i've get new words from thishttps://intowninteriors.com/
ReplyDeleteAt the heart of Intown Interiors lies a visionary design philosophy that blends artistry with practicality. Drawing inspiration from diverse influences, including contemporary trends and timeless classics, their designs transcend fleeting fads, creating spaces that stand the test of time. Each project is approached with a keen eye for detail, thoughtful spatial planning, and a deep understanding of the client's vision and lifestyle.
This comment has been removed by the author.
ReplyDeleteIt's evident that great care and attention to detail have been poured into crafting these beautiful spaces. Thank you for sharing these inspiring designs with us!. To explore more about kitchen Renovation visit Kitchen Renovations Delray Beach
ReplyDeletegood
ReplyDeleteI'm constantly learning something new from your blog. You're a wealth of knowledge Intown Interiors, our difference lies in our firm promise of brilliance. We don't just undertake remarkable results; we supply them. With particular care to detail and a desire for perfection, we flawlessly translate your dream into reality.
ReplyDeletehttps://intowninteriors.com/Intown Interiors, our difference lies in our firm promise of brilliance. We don't just undertake remarkable results; we supply them. With particular care to detail and a desire for perfection, we flawlessly translate your dream into reality.
"Your blog is a gem! The detailed insights into kitchen renovations are exactly what I needed. Thanks for the great information!" Nzuri Cabinets are fully licensed general builders, specialising in Kitchen Renovations Brisbane Northside.
ReplyDeleteWhat a meticulous transformation! Your detailed process for refacing kitchen cabinets is both inspiring and informative. The before-and-after pictures speak volumes about the incredible difference this renovation has made. Well done!
ReplyDeleteComplete Home Renovations
Thanks for sharing this informative post on office renovation contractors! It's great to have insights on choosing the right team for the job. Keep up the good work!
ReplyDeleteExterior Upgrades Services in St. Augustine FL: Transform your home's exterior into a masterpiece with our specialized exterior upgrades services in St. Augustine, FL. From enhancing curb appeal with new siding and landscaping to creating inviting outdoor living spaces with custom decks and patios, our expert team ensures your home stands out while increasing its value and charm.
ReplyDeleteDesigned for durability and aesthetics, Judge Hardware's door knobs come in a variety of finishes and styles to match any home decor. Whether you prefer modern sleek designs or classic traditional looks, you'll find the perfect door knob to complement your interior. Easy to install and built to last, our residential door knobs are the ideal choice for any homeowner looking to upgrade their doors.Choose Judge Hardware for a seamless blend of style, security, and reliability in your home.
ReplyDeleteFinding the right renovation contractors can make all the difference in your home improvement project. I recently hired a team for a kitchen remodel, and their expertise turned my vision into reality. From planning to execution, they handled every detail meticulously, ensuring quality and staying within budget. For anyone looking to upgrade their home, I highly recommend doing thorough research and choosing contractors with a proven track record of excellence. The right professionals can transform your space and elevate your living experience.
ReplyDeleteTo know home inprovement tips please visit this website Renew My Nest.
ReplyDeleteThank you for making this article, we have so much to learn from this. Informative and knowledgeable. Meanwhile, If you want to residential door knobs you may visit there. You can also check our available services to offer. Thank you!
ReplyDeleteThanks for all the valuable info!
ReplyDeleteStair Tread Covers
I found it very informative.....
ReplyDeleteRubber Strips
Love it !
ReplyDeleteGreen Tarpaulin
Wow, what a fantastic approach to kitchen renovation! Refacing kitchen cabinets while reusing the originals is such a smart and sustainable idea. Not only does it save costs, but it also adds a personalised charm to the space. Great job! THEJEMBE
ReplyDeleteI love the wonderful way you separated this! It's dependably perfect to see new bits of knowledge on buy Tarpaulins. Can hardly hold on to evaluate your ideas!
ReplyDeleteWonderful!! I'm moving into a house with the same cabinets and have been wondering what I can possibly do. This looks great!!
ReplyDeleteVery informative post! Renovating a home requires careful planning, and your blog does an excellent job explaining what to expect. The emphasis on hiring qualified professionals was spot on! Those in need of reliable Home Renovations in Prospect SA can trust Builders At Your Service. Fully licensed and insured, we turn visions into reality.
ReplyDeleteGreat job on this kitchen renovation! Refacing cabinets instead of replacing them is such a smart and sustainable choice it’s amazing how much of a transformation you can achieve while keeping the originals. At Niven Builders, we also love helping homeowners get the most out of their existing cabinetry with cost-effective upgrades like this. It's all about maximizing style without unnecessary waste. Looking forward to seeing more of your projects!
ReplyDeleteLaneway Homes & Garden Suites
ReplyDeleteLaneway House Builders Vancouver
Thinking about upgrading your home? Hiring complete home renovation contractors ensures every detail - from layout to finishes - is handled with precision. If you’re considering kitchen remodeling in Lutz, FL, professional guidance makes all the difference in achieving a stylish and functional space. Saint Pauls Roofing & Construction LLC delivers expert craftsmanship and personalized remodeling solutions that enhance comfort, beauty, and value, helping Florida homeowners transform their dream designs into reality. www.saintpaulsconstruction.com
ReplyDeleteThis comment has been removed by the author.
ReplyDeleteThis comment has been removed by the author.
ReplyDeleteAchieve exceptional architectural design noosa with creative, practical, and visually striking solutions. Visit studionicholas.com.au for expert guidance in designing buildings and interiors that blend innovation with timeless elegance.
ReplyDelete