Old House Restoration

A real family makes an old house their home...for the 2nd time
The Splendido's renovate, restore and rejuvenate their home with their own hands - all while living in the house
and balancing their family needs...you know...like most families have to do it!

Showing posts with label Home Comfort. Show all posts

Wednesday, August 6, 2014

Another boring thermostat...or is it?!

So of course when you are installing a new state-of-the-art heating and air conditioning system, it would not be complete without a new state-of-the-art thermostat....BUT...never mind "would not be complete" - because the many benefits of the new system will NOT be realized without a new thermostat...AND never mind the name "thermostat"...these new "thermostats" do SO much more that they are now called "controllers."

They no longer just determine how hot or cold your home is...they control the quality of your indoor environment!

Nostalgic Moment: Remember when all you needed was one of these?

How to change my thermostat to a programmable thermostat

Enviromental P.S.A. - When you take that round dial off your wall to replace it with a Controller - remember there is mercury in that round dial - so they must be properly recycled. Luckily a new law makes this process easy. All home centers (and any place you can buy a new thermostat/controller) must have a thermostat recycling bin. Easy peasy lemon squeezy.

Why Replace Your Old Dial (or any non-programmable) Thermostat
This is easy. Save Energy = $ave Money. Per Energy Star a properly used programmable thermostat can save you up to $180 per year on energy costs. Also, through 12/31/14 you can receive a $25 rebate from National Grid for installing a programmable thermostat. In most cases your payback will be less than a year. It really is a no brainer. Also if you are only changing the thermostat - it is usually a very easy process...unless you are like me who had to get one with ALL the bells and whistles...even that install was pretty easy.

How to Replace Your Thermostat
In the age of iPhones and everything Tech-Geeky - of course I selected an controller that has a touch screen, is WiFi compatible so I can control it from anywhere in the world, and takes all the guess work out of Home Comfort. I selected the Carrier Infinity Touch WiFi Controller.

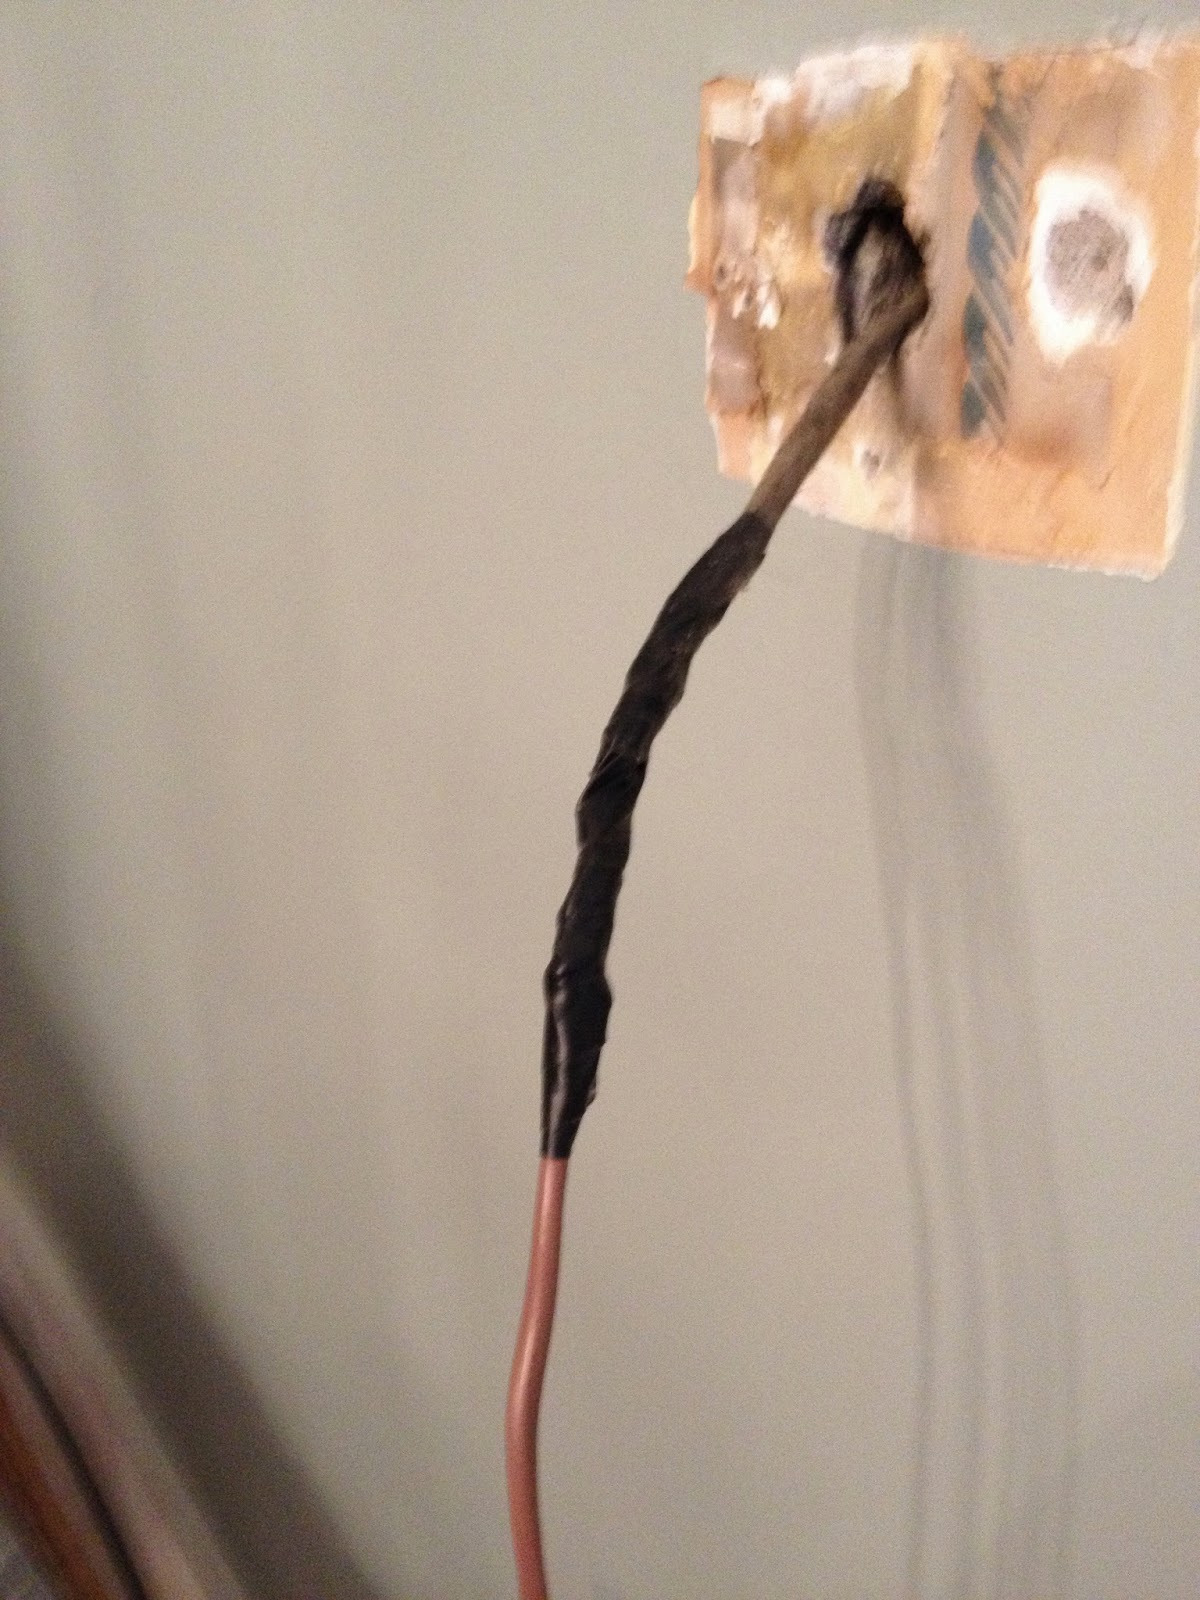
Step 1: Remove the old thermostat

Step 2: Run a new thermostat wire


Many of the old thermostats only had two wires. Whereas, some of the new controllers use thermostat wire that have 4 wires. After-all you need more wires to control more aspects of your indoor air quality.

NOTE: if you are installing a basic programmable thermostat it is very possible you will not need to do Steps 2, 3 or 4. It depends on how many wires the new stat requires.
  • After you remove the old thermostat you should have some of the old wire sticking out from a hole in the wall. 
  • Disconnect the old thermostat wire from your furnace/ac if you have not done so already - do not pull it out of the wall yet!
  • You need to connect your new thermostat wire to the old wire by wrapping/twisting the wires around each other - then taping the ends together - making smooth transitions so there are no bumps that will get caught during the next step
How to chnage my thermostat
  • Have Paige hold the spool of new wire with a pencil through the middle so it will roll out nicely during the next step - it is so nice to have help!!!


How to change my thermostat to a programmable thermostat
  • Go downstairs (or wherever your old wire goes from your thermostat location) and look for the thermostat wire
  • Hopefully yours does not come out from under your return ducts like ours did.
  • I had to disassemble a portion of the return ducts so that Lily could perform the next step
  • Have My Little Helper Lily pull on the old thermostat wire until enough of the new wire is available to reach your furnace and then to the outdoor condenser....important - make sure there is at least a few inches sticking out of the wall upstairs where the new thermostat will be installed.
Step 3 - Connect the thermostat wire to the furnace

How to change my thermostat to a programmable thermostat Basically is is a matching the colors game. On the control board inside my furnace there are 4 slots for thermostat wire. Green, Yellow, White, Red. My thermostat wire had 4 colors (Green, Blue, White, Red). So I just matched up as many as possible and then place the blue in the yellow slot.

FYI - the color order really does not matter as long as you keep the same order throughout all the next steps...but of course it is easier if you just try to match the colors!!!...also most technicians will expect the colors to match what the system suggests.

Step 4 - Connect the thermostat wire to the AC

Sorry no pictures of the outside units control board...but it looks similar to the furnaces. the same colors, too. So you need to connect thermostat wire from the furnace to the AC - following the same color pattern. You can see in the above picture there are actually two blue wires, two green wires, etc. One set is coming from the controller to the furnace. The other set is going from the furnace to the AC. We ran the thermostat wire to the AC through the hole in the cinder block we made for the line set (discussed in Step #3 of the AC Installation entry).

Step 5 - Attached the back plate to the wall
Just make sure it is level and attach with a few screws. See picture in next step.

Step 6 - Connect the Thermostat Wire to the Controller
Just follow the same color pattern as in steps 3 & 4


Step 7 - Program your Controller
Every controller may have different programming steps. Some are more difficult than others. the Infinity Touch Controller does all the thinking for you. 

If you can answer simple questions like this:

How to change my thermostat to a programmable thermostat

...then you can program this controller to help your system maximize your home comfort and maximize your energy savings.

You are done with your new controller install.


Here is some more info on the various benefits of the Infinity Touch Controller...

The next 4 paragraphs are from the Carrier site because it kind of says it all...
"The control knows to conserve energy while you’re out and will turn back on at just the right time to create the perfect temperature for your return.

Because vacations cost enough money these days, let the Infinity System know how long you’ll be gone and it will make sure to save on energy costs.

Throughout the day the Infinity Touch control will intelligently react to changing outdoor temperatures and the conditions in the house to make sure you’re always getting peak efficiency and performance. Say, for hot summer days, you like to set your system to 78 degrees while you’re gone so you can save some energy but you always want it to be back at 72 when you return. The system will figure out if easing back to 74 instead will save you more energy and money and do just that. We call that a dynamic, self-determined “away” temperature control. Smart, huh?

The control will communicate to you, too. It’ll let you know when your air filter needs replacing or if service is needed. If you like, it can even communicate with your local Carrier® expert and tell him what needs attention."
...back to my commentary...

The Main Screen 
Gives you the date, time, room temperature and current days forecast (note only the WiFi version has weather forecast capabilities).

How to change my thermostat to a programmable thermostat - Infinity Touch Controller


Matches Any Decor
Note the white face plate - the box also comes with a silver plate and a black plate. It can match any decor.


The Settings Screen
The next screen allows you to easily adjust any settings with one touch. These adjustments would be temporary and then will return to your programmed settings after the desired time you select.

How to change my thermostat to a programmable thermostat - Infinity Touch Controller

The Menu Screen
  • Profiles - you set your desired temperatures for when you are Home, Wake, Sleep, Away
  • Schedules - You can set all your schedules here. Whether you want the same settings for all 7 days in a week or a different setting for each day...the controller will ask you series of simple questions that will guide you to your perfect settings.
  • Vacation settings - you can pre-program the exact days you will be away on vacation so you do not waste energy heating and cooling.
  • Energy Tracking - You can enter your Price per Kilowatt and Price per Therm. Then the controller will track how much you are spending per day.
  • Display - you can set up your Screen Saver settings - see the very last picture
This one control can manage temperatures, humidity, ventilation, airflow, indoor air quality and up to eight zones.

FYI - I set up all my profiles, schedules, vacations, energy rates, connected to my WiFi - the whole shebang - in about 30 minutes...you know...probably less time than it takes to read this entry! ;-)   ....without opening the Instruction Booklet....just press the buttons and follow the on screen prompts...it was fun!...yes I am a bit tech-geeky!

How to change my thermostat to a programmable thermostat - Infinity Touch Controller

The Weather Forecast
Even quicker then my iPhone ap - just press the today's weather portion on the Main Screen (see above picture) to get the next 5 days Forecast...again only if WiFi equipped...but really - if you are going to go all out with a state-of-the-art energy saving system - then get the WiFi version too!

The nice part is - with the weather (WiFi) option - the system will take the outside weather into consideration when determining how to run most efficiently. Re-dic-u-lous!

How to change my thermostat to a programmable thermostat - Infinity Touch Controller


There's an Ap for That!

No shocker here - of course there is an ap! Everything has an ap these days. 

With the MyInfinity Ap - I can control my "thermostat" from my iPhone, iPad, home laptop, work desktop...from anywhere.

The nice thing about the ap...ALL the screens look exactly the same as the main controller's screens. Learn one. You learned them all.

Here are 4 random screens from my iPhone Ap:


The best part...say Karen and I are watching a show and she says she is warm. I just whip out my phone and adjust the temperature. I never have to leave the sofa. Couch Potatoes Unite!

No seriously I have used the ap many times. I love it!

Screen Saver
As if all of this was not cool (pun intended) enough...you can also upload your own personal Screen Saver

So now instead of staring at the temperature...I have another spot I get to see my 3 little cuties:

Best. Picture. Ever.


Monday, July 28, 2014

Air Conditioning Installed (and more than you ever wanted to know about AC)

I have always wanted a house with Central Air. I sweat a lot! I mean buckets. When nobody else is sweating, I am changing my shirt. Karen used to say I should go to the doctor and get that checked out. It's been 43 years and I have yet to live in a house with Central Air...or so I thought. I just found out that is not quite the truth. I was talking to my mom just last week when I said this same thing. It turns out we had central air on Buttonwood Ave (my childhood home)...but after the first month's electrical bill came in...she says we never used it again. When she says NEVER...she means it. Because I never knew we even had it! So I guess technically I can still say - it has been 43 years and I never lived in a house that used Central Air.

I remember going over friends' houses in the summer while growing up and feeling the "ahhhh" of central air. I wanted it then and I wanted it in my own house. Up until now I made up for the lack of central air with window units...a lot of window units. We used 5 in the last house...and 6 (yikes!!!) last year in this house. Ridiculous. I know.

I HATE window units. They are UGLY. They are NOISY. They are HEAVY. They are INEFFICIENT. They can wreak havoc on your double hung windows - ever notice how the window pains started to rattle from all the vibration?! They are just a huge PITA! You have to store them and put them in and take them out every spring/fall. Talking about fall...last October I dropped one of my window units while taking it out. Lets just say window units are not like Bumbles. They do not bounce. HeHeHe.

One of Karen's first selling points to get me to look at this house was, "...and it has forced hot air. No AC, but it has duct work." I must admit I went from "No way. We are not moving" to "Well maybe it can't hurt just to look."

Some helpful tidbits you should know when selecting an AC

how to install central air - Infinity Air ConditionerOnce again, as I did for my new furnace, I checked out the Scratch and Dent section at my work. There are some hidden gems in there! I found a Carrier Infinity 18 Air Conditioner. Sure it was left over from 2003 (11 year old Paige was quick to point out that was a great vintage), but also like Paige it was the Top of the Line for that year. It is an 18 SEER air conditioner. SEER is Seasonal Energy Efficiency Rating. It is the standard efficiency rating for all air conditioners. The higher the SEER the more efficient the unit. The minimum in 2010 was 10 SEER, therefore this unit is 1.8 times more efficient than that 10 SEER unit, which equates to 44% in electrical savings. Today the federal minimum SEER is 13...and Carrier's current top of the line Infinity Air Conditioner is 21 SEER. So you can see this unit is still closer to the top of the line than the bottom of today's standards.

Most likely my mom's air conditioner was a 6 SEER back in the late 70's - in fact most AC's manufacturer through 1992 were 6 SEER or less! Keep this in mind as you read what I am about to share with you...especially if you have a really old unit outside your house! My new condenser is 18 SEER. It is 3x's more efficient than that old unit and it will use 66% less electricity to run it....even if you are one of the lucky ones that have a 10 SEER unit outside your house - moving to Carrier's mid-tier 16 SEER AC will save you 38% on your electric.

On top of the increased money savings, the Infinity models are also quieter (less noise outside the bedroom windows) and have 2 speeds which allows a more comfortable indoor environment. The fan can run at lower speeds thus keeping your living environment at a more constant temperature by keeping the unit on longer at a lower setting, instead of cycling on and off constantly at the high setting (cycling = blasting cold air to bring the room down to temperature and then shutting completely off until it gets warm again, then repeating this cycle over and over).

Installing the Condenser (AC/Central Air)

Step 1 - Connect the furnace to the ductwork
In the last entry I mentioned we had placed the furnace into position awaiting for the ductwork to be attached to the furnace and evaporator coil. The furnace will act as the air handler (fan) that will push the conditioned air through the supply ducts and pull an equal amount of air out of my living spaces and back to the system through the return ducts. However for this to work the furnace actually needs to be connected to the house's ducts. Each job is different. Ceilings are different heights. Sometimes there are other pipes in the way. Sometimes the furnace may be in the attic. So the ductwork/plenum needs to be fabricated by professionals, with specialized machines, to meet the specs for the job at hand. I used RMB Heating and Cooling. Brendan and his son, Ryan, really know what they are doing (BTW they are very nice people too. Polite and professional). They made the custom pieces and connected them to the house's ductwork for me.

Before                                                                                  After
No Ductwork                                                              Like a piece of art

Just in case you forgot what my huge old system looked like:

 
The original system for the house

Step 2 - Make a hole in the wall
Most cinder block walls are VERY easy to break through. In fact, if you drop a new cinder block it most likely will break apart into several pieces. I have even seen cinder block that has started to crumble from getting rained on. Well I think I mentioned that our house was built by Paul Schaefer. He has been called a Master Builder. If master builder means building houses that are solid as a rock, then by all means he was a master builder.

All my work friend and I had to do was break a 2 inch hole through one cinder block 8 inches thick. No big deal right?!...A hammer drill, 3 drill bits, 3 pound hammer, cold chisel, a sledge hammer later and 2.5 hours later we were through. You know how they say they just don't build them like they use to...well the same goes for cinder blocks!!! Holy cr*p.

how to install central air - Infinity Air Conditioner


Step 3 - Squeeze 5 Items through a 2 inch hole

how to install central air - Infinity Air Conditioner
how to install central air - Infinity Air ConditionerWe placed a 2 inch PVC pipe through the hole. Then through that hole we threaded the two copper tubes of the line set, the electrical line, the thermostat line and the condensate pump tube. We ended up changing the route for the condensate tube later.


Step 4 - Run the condensate pump tube to a drain - and why you need the pump

The condensate pump sits on the right side of my furnace in the pictures in Step 1. All air conditioners and heat pumps create condensate as a by product of the cooling process. The warm humid air condenses on the evaporator coil. This condensation needs to be carried to the outside or a sink to drain, otherwise you will have a wet basement (or attic) depending on the location of your system. At first, we tried sending it outside, but then remembered that we are also installing a high efficiency furnace. All high efficiency furnaces are also known as Condensing Gas Furnaces. Like the AC, they also create condensation as a by product of the heating process. All standard efficiency furnaces (80% AFUE) do not produce condensation. However, all Carrier furnaces greater than 90% AFUE are condensing gas furnaces (if you forgot what AFUE is check out my last entry). Therefore, since we will need to use the condensate pump during the winter - draining to the outdoors is not an option. A frozen tube will lead to a flooded basement. So we ran the tube in the ceiling rafters and over to the laundry room sink. You could also use a floor drain if your basement has one. I threaded the tube through an extra piece of copper tube to keep the tube exactly where I wanted it in the sink.

Step 5 - Solder the Line Set to the Evaporator Coil and Outdoor Unit
The larger tube is now covers by insulation.
The line set carries the refrigerant between the outdoor unit (AC or HP also called a Condenser) and the indoor unit (Evaporator Coil or Fan Coil if you are not using a furnace).

What the Line Set does and how it works  ***Warning*** I am about to get more technical than I ever intended...but after I wrote it I could not get myself to delete it...when your eyes start to glaze over...and they will...just skip to Step 6...The line set is made of two copper tubes that are imperative for transferring cool and warm between the indoors and outdoors. There is a larger copper tube that carries the cold vaporized refrigerant. This tube is covered by a insulated foam cover. And a smaller liquid tube which carries the warmer liquid refrigerant. The Outside Unit (Condenser) contains a compressor in it. This compressor compresses the refrigerant into a cold vapor gas. This gas is carried in the larger copper tube to the evaporator coil that sits above the furnace. The furnace blows warm air over the evaporator coil. The cold refrigerant extracts the heat from the warm air, thus making the air cooler as it moves over the coils. (Note air conditioning does not add cold to the air, it actually removes heat from the air). This cold air is then sent through the supply ducts to your living spaces. Your return ducts bring warm air back to the furnace were the refrigerant absorbs the warmth from the air. When it does this the refrigerant condenses back to a liquid. This warm liquid refrigerant is carried back to the condenser in the smaller copper tube. This copper tube connects to the coil that surrounds your air conditioner. Your air conditioners fan will turn on, sucking the relatively cooler outdoor air over the coils absorbing the heat from the refrigerant in the coils and the fan then blows the warmed air out through the top of the AC. The compressor then compresses this refrigerant, starting the process all over again.

BTW - today's most manufacturers use a refrigerant called 410a. It is safe for the environment. Many systems installed prior to 2010 had R-22, but it was deemed unsafe for the environment and banned from being manufactured in new systems. However, Carrier began switching to 410a back in 1996 because it was more eco-friendly. They trademarked the name Puron for their 410a systems.

Step 6 - Test the pressure in the system
Using a special vacuum pump and gauges (my work friend owns) you need to verify there are no leaks in the refrigerant system. After this step is performed you can release the refrigerant that is stored in the outdoor unit during manufacturing into the rest of the system.

Step 7 - Connect the Electricity

If you do not already have an condenser, than you will need to run a line to the outside that is connected to its own circuit breaker(s). You should also check to see if your electrical service can handle the increase draw. As such, we had our 100 amp service updated to 200 amp service last fall in anticipation of adding AC. Then this spring we had our electrician (Niskayuna Electric) run the line, too.

Then we attached a Disconnect Box to the outside of my house and connected the electrical line. The Disconnect Box is then connected to the Condenser with a Whip (the dark grey line in the picture to the left). The disconnect box just makes it very easy to disconnect the electricity running to the unit...thus making it easier and safer to service the AC.

In the picture to the left you can also see the refrigerant lines connecting to the outdoor unit as discussed in Step 5.


BEFORE

how to install central air - Infinity Air Conditioner
AFTER


Pretty well hidden from the driveway view, however...
...looks like I better break out the hedge trimmer next!

...but more importantly...completely hidden from the front walkway view...
...thus keeping the charm of our 1938 stone and clapboard home and wooded lot...and
...happy wife...happy life  :-)


Oh...btw - I heard a rumor there is about to be a surplus of window units available on Craigslist soon...if you are looking for one (or four) let me know.

Sunday, July 20, 2014

Furnace Removal, Furnace Efficiencies, Air Purification & More

how to remove a furnace
So this is the furnace that was in the house when we moved in. It is about 15 years old and worked well. It kept us comfortable for our first winter in the new house. So of course I had to replace it. Wait! What?

See even though it was "fine"...I wanted better. I work for the RJ Murray Co., Inc. in Latham. We are the oldest Carrier distributor in the world. Since 1933 we have been selling and supporting the Carrier brand of heating, cooling and indoor air quality (IAQ) equipment. Did you know? Willis Carrier is called "The father of modern air conditioning" having invented it in 1903!

So it is understandable that this Lennox stuff was not going to last in my house for long. They are the competition...aghast!

Plus there were real life reasons I wanted to change out our working furnace. First, 10-15 years is the average life cycle for a furnace. So we were already on borrowed time...and living in Upstate NY...enough said.

The second reason had everything to do with this yellow tag. 80.0 AFUE. It is an 80% furnace. Although it is a 25% more efficient that the 64 AFUE furnaces of a few decades ago, it is still 21.75% less efficient than Carrier's
Infinity 98 Gas Furnace With Greenspeed Intelligence (Infinity Furnace for short) of today, which is an amazing 97.4 AFUE.

AFUE stands for Annual Fuel Utilization Efficiency. Basically it is the standard for all heating equipment to help you compare one unit's efficiency to another. The higher the AFUE the more efficient the furnace/boiler is.

To put in it real money terms - With an 80% furnace, for every $1.00 you send to National Grid for natural gas to heat your home...$0.80 is used to heat your home and the other $0.20 goes straight up the chimney (literally). With the 97.4% Infinity furnace only $0.026 is wasted.

It is easy to see the savings that will be had this upcoming winter and every year after that.


Here is the EnergyGuide tag off the new furnace:

This Carrier Infinity Furnace is so efficient it is off the charts! 
No. Really. It is more efficient than the line graph - look at the pic!


The first step before you remove the old furnace is to get the new equipment home. Luckily for me - I just had to go to the scratch and dent area and pick out the furnace...and in my case a condenser and evaporator coil since I am also adding central air (foreshadowing of future posts).

The scratch and dents are exactly what they sound like. Units that cosmetically cannot be sold as new, but will work perfectly. If you are looking to save money, you can let your hvac dealer know if the distributor has scratch and dents you would be interested...at a reduced cost of course. Ask for a comparative quote so you can make an educated decision. Some of the scratch and dents are really minor and for most homeowners - the furnace resides in a basement, an attic or in a closet...so as long as the blemish is only cosmetic who really cares?! Don't accept any equipment that has more than cosmetic damage...however this should not be an issue, because I know we don't sell them to our dealers. Hopefully all the other brands follow suit. 

Removing the furnace and plenum and more

how to remove a furnace 
So like I said, I work for the local Carrier Distributor. Just because I work "in the industry" does not mean I know what the hell I am doing when it comes to removing and installing a new hvac system. Luckily for me I work with some awesome people (friends) that do. Myself and two co-workers did the removal. They volunteered to helped me long ago when we first moved...the conversation kind of went like this...They asked me, "How's the new house?" I said, "Great." They said "How is the system?" I said, "it is an older Lennox system, but there is no AC." They said, "we can help you when the time comes." I joked, "I hope you don't come to regret saying that."  :-)   12 months later, they were in my basement helping me...and they have been back several times during the course of this project. Good guys! I am lucky.

It took 2 hours to remove the furnace, take the ridiculously large plenums off (those two oddly shaped pieces of sheet metal that connect the furnace to the supply and return ductwork) and then to place the new furnace in position to see what we were dealing with.

Another added benefit of this project was gaining a nice amount of floor space in the basement. The new furnace, plenum and connecting ducts were going to take up about half the room of the current setup. Bonus! Now we can store more stuff! <---I am being sarcastic in case that did not come across....but seriously who doesn't like having more storage?!


From This                                                        To This

how to install a furnace


Granted it is not fully hooked up and we still have a long way to go, but if you look closely at the floor in the after picture, you can see the unpainted section. That is the storage area that was gained.

how to install a furnace
Here is another view of the furnace and the evaporator coil.

Also down on the lower left you will see the Carrier Infinity Air Purifier that I am adding to the system in replace of the standard cartridge filters on most systems. This system is the only system on the market that CAPTURES & KILLS airborne pathogens such as bacteria, viruses and mold as small as 0.01 microns – that’s 18,000 times smaller than the head of a pin. And because it is attached to the ductwork - it is a whole home air purification system...unlike those towers that can only do one room. In a home with 4 people (Karen and all 3 kids) that suffer from allergies - I'll take all the help I can get. ;-) But seriously it will be great knowing that I am doing everything I can to help them all breathe easier.

BTW - this Carrier Infinity Air Purifier or its little brother, the Carrier Performance Air Purifier, can be added to any existing forced air (heating and/or AC) that has ductwork - no matter what brand.

Now that the system is in place the next step is to have some new ductwork/plenums made to connect it to the current ducts. Then we can finish installing it and the condenser. More posts to come later...


....because now I am off to the recycling yard


Want to find out more?
 
If you want to get more information on any of these Carrier products or find a local expert Carrier dealer, you can check out our consumer site UpgradeToComfort.com. It is a site I helped design to educate homeowners to allow them to make an informed decision when it comes to their heating, cooling and IAQ needs.