Old House Restoration

A real family makes an old house their home...for the 2nd time
The Splendido's renovate, restore and rejuvenate their home with their own hands - all while living in the house
and balancing their family needs...you know...like most families have to do it!

Showing posts with label Kitchen. Show all posts

Thursday, May 21, 2015

Decorative Magnetic Chalkboard from an Old Screen Door

I have so many projects to get caught up with. Since the kitchen was finished (for now) earlier this month, Karen (aka Splendid Stems) has been extremely busy with wedding season! Karen should be posting on her blog soon (hopefully), but as I know all too well - sometimes you have to keep moving on to the next project or baseball or softball or wedding...it leaves very little time to write...but we will get there I promise. I too have a vested interest in her getting her blog rolling again, because besides seeing and sharing her wonderful floral creations, many of my latest projects have been related to structures I had to build for her creations....and they are REALLY cool! Sorry no spoiler pictures yet.

Karen has always said - she thinks it - and I make it happen. This entry is no different...Karen had this great idea for our new kitchen. She wanted a control center for the family. A chalkboard, magnet board, cork board message center if you will. To her credit - she did most of the leg work on this one. She has been saving the main 'ingredient' for years now from one of our previous rentals. Then she went out and purchased all the other components. She was determined to do this one, but unfortunately ran into trouble cutting the other components to size...and I'll admit - it was not easy.

Decorative Magnetic Chalkboard from an Old Screen Door

We have moved this old wooden screen door from house to house for a while now. Every time we moved I would bellyache, "Do we really need to bring this?" She would say, "Some day we will use that old screen door for something cool."

Step 1 - Remove the Old Screen

Step 2 - Paint
We chose the same paint we have used for all our trim work - see any of my previous painting related entries for the specs.

Step 3 - Purchase sections of flat sheet metal from a hardware store

Step 4 - Cut the sheet metal to size
I used my tin snips to cut the sheet metal to fit in each of the 3 sections of the screen door

Step 5 - Chalkboard Spray Paint
Sand one side of the sheet metal so the spray paint will stick. Spray a primer on the sheet metal. Then spray a few coats of Chalkboard spray paint.

Step 6 - Attached the Sheet Metal

Flip the screen door over so the back of the door is facing up (see picture)

I used self tapping screws to cut throw the metal and into the wood frame.


Step 7 - Hang it

After Pictures


The board is both a chalkboard and a magnet board. We have an old window we want to make into a cork board, but we have not finished that one...yet!

Just the Staples

As you can see the kids have taken over the shopping list duties....hey at least Apples made the list! (thank you Luke).

...who knows maybe one day I will learn my lesson and just stop complaining...because Karen was right - we did make something cool out of that old screen door.

Tuesday, May 5, 2015

Kitchen Renovation #4 - Refacing Kitchen Cabinets...reusing the originals!

Kitchen Renovation - Refacing Kitchen Cabinets - New Hardware
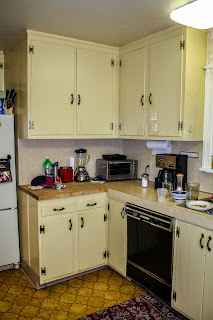
Not as groovy as it once was
I remember walking through the house during our inspection day with my iPhone taking a video. I was making a video tour of the house to post to my YouTube channel so my parents could see the house.  On the video you can hear me tell the listeners - so far the house has looked very good....until you walk through this door. Behind that door was the bulter's pantry, breakfast nook and kitchen. Everything was just so ugly. Don't get me wrong...I'm sure Greg, Marsha, Peter, Jan, Bobby and Cindy would have thought it was groovy back in the 70's...but it was not up to 2015 standards (or the 80's or 90's for that matter).

Everything in the kitchen was in need of help. So far I have: 
  1. Rehabbed the kitchen floors...including linoleum removal and restoring the wide plank pine floors 
  2. Replaced the gross stove and built a great new range shelf and  
  3. Removed the hideous wallpaper, painted and changed the light fixtures.
Kitchens take a long time. I have been working on the kitchen for 5+ months (over the past 14 months)...and there was just one more area I wanted to refinish during this stage of the kitchen renovation - the cabinets. 

Refacing Kitchen Cabinets...reusing the originals

Step 1 - Take Before Pictures

Kitchen Renovation - Refacing Kitchen Cabinets - New Hardware

Kitchen Renovation - Refacing Kitchen Cabinets - New HardwareKitchen Renovation - Refacing Kitchen Cabinets - New Hardware 

Kitchen Renovation - Refacing Kitchen Cabinets - New Hardware


Step 2 - Make a Plan

There were 18 cabinets plus 7 drawers. Do to space constraints in my workshop - I divided the kitchen into 3 sections. Therefore every step you see below was actually done three separate times...did I mention? Kitchens take a long time!

Step 3 - Remove the Cabinet Doors

Kitchen Renovation - Refacing Kitchen Cabinets - New HardwareKitchen Renovation - Refacing Kitchen Cabinets - New Hardware
Number all the doors before you take them off the cabinets with a Post It so you know which order you took them off in and what order to put them back up in.

Kitchen Renovation - Refacing Kitchen Cabinets - New HardwareEnlist good help...lucky for me good help is NOT hard to find - My Little Helper never disappoints.

Kitchen Renovation - Refacing Kitchen Cabinets - New Hardware

Step 4 - Remove the old hardware

Kitchen Renovation - Refacing Kitchen Cabinets - New Hardware


Step 5 - Sand and Wipe 

Sand the naked doors then wipe the dust off with a tack cloth

Step 6 - Measure & Cut

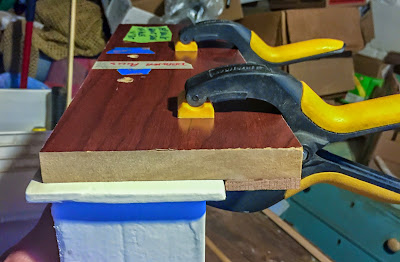
I used 1/4" x 3" pieces of poplar, cut to size, to frame out the doors to create the illusion of a recessed panel.
Kitchen Renovation - Refacing Kitchen Cabinets - New HardwareKitchen Renovation - Refacing Kitchen Cabinets - New Hardware

Step 7 - Glue and Clamp

Kitchen Renovation - Refacing Kitchen Cabinets - New Hardware

Kitchen Renovation - Refacing Kitchen Cabinets - New HardwareKitchen Renovation - Refacing Kitchen Cabinets - Glueing Wood - Wood Clamps

Kitchen Renovation - Refacing Kitchen Cabinets - Glueing Wood - Wood Clamps

In this pictures you can see my new favorite glue. Up to this point I had always used Elmer's, but then I saw Tom Silva using Titebond II Premium Wood Glue on This Old House. I have learned so much from Tom Silva over the years...and he did not disappoint. This glue is just better...and the round hot dog stand ketchup style bottle is much more ergonomically correct for squeezing over and over again...

Step 8 - Sand, Wipe & Paint the Cabinet Boxes

Kitchen Renovation - Refacing Kitchen Cabinets - Paint Cabinet BoxWhile the wood glue was drying on the cabinet doors, I sanded the cabinet boxes. I followed that with wiping the dust off with a tack cloth, then painting them with the same Benjamin Moore White Dove paint I used on all the trim work. I then protected all the tops of the shelves with MinWax Polycrylic. Again it is a water-based clear coat for white finishes. Remember polyurethane will add an amber shade to any project...so don't use polyurethane on anything you want to be white!

Kitchen Renovation - Refacing Kitchen Cabinets - Paint Cabinet Box


Step 9 - Add Baseboard Trim

Ok so this step really has nothing to do with refacing your cabinets....but I also took the opportunity to add some matching baseboard trim to the cabinets ends to match the rest of the walls. Note: it is easier to pre-paint the baseboards and any quarter-round trim prior to cutting and installing. Then just touch up any necessary areas after installation.

Kitchen Renovation - Refacing Kitchen Cabinets - Base board and trim


Kitchen Renovation - Refacing Kitchen Cabinets - ending a Baseboard and trim
The proper way to end a piece of baseboard
Most of the time your baseboard will end at a door frame or a inside or outside corner - in which case you will just need to miter the baseboard. However, it doesn't happen often, but in case this ever comes up - there is really only one proper way to end a piece of baseboard in the middle of a wall (or cabinet in my case).

You want to cut a piece to fit into the end that you can glue into place so there is no end grain showing. See the picture to the right. I could write the steps, but seeing is much easier. Here is a video I found that shows you the process. 
Step 10 - Don't forget the Drawers

Kitchen Renovation - Refacing Kitchen Cabinets - minwax high performance wood fillerI was not changing the face of the drawers, because the new drawer pulls (see the After Pictures) will add enough interest and be the focal point of the drawers. However I did have one drawer that needed some reconstructive surgery.

As you can see this drawer was missing a major section of the lower center and right. I built a form around the drawer with some sections of wood covered in packing tape. I then used a Wood Filler. Note there is a difference between Wood Putty and Wood Filler. Wood Putty is for just filling small nail holes or indentations in a wood surface. A wood filler has the structural strength capable of rebuilding the wood. I used MinWax High Performance Wood Filler. The packing tape I mentioned above was used to keep the wood filler from adhering to the form I made. After the filler dried I was able to sand it to shape, then paint. Good as new.

Step 11 - Spackle

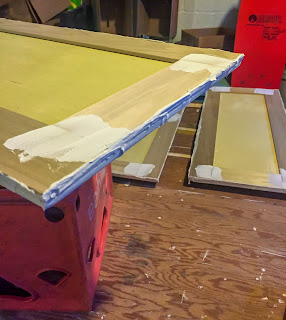
Kitchen Renovation - Refacing Kitchen CabinetsIn order to hide the fact that the 1/4" trim boards were glued on top of the existing cabinet doors, I used joint compound along the 4 edges of each cabinet. Then I sanded everything smooth with my orbital sander with 220 grit.


Step 12 - Paint the Cabinet Doors

Painting the cabinet doors was a another monotonous job by itself. Each door had to be painted 6 times which included 13 steps!...and remember I had 18 doors (plus 7 drawers). That is 108 door sides I painted - how many things can you think of that you want to do 108 times!...and that is just the cabinet doors!
    Kitchen Renovation - Refacing Kitchen Cabinets
  1. Prime the back of cabinet door (#1)
  2. Flip over & prime front of the door (#2)
  3. Sand both sides
  4. Wipe of dust with tack cloth
  5. Paint coat 1 of the back (#3)
  6. Sand
  7. Wipe off dust
  8. Paint coat 2 of the back (#4)
  9. Wait to dry for a full day or more (cure)
  10. Flip over and paint coat 1 of the front (#5)
  11. Sand
  12. Wipe off dust
  13. Paint coat 2 of the front (#6)
Kitchen Renovation - Refacing Kitchen Cabinets

Of course it took me until my last 5 doors to get smart. Thats when I finally raised the cabinets onto boxes. It was easier because I had to bend over less, plus I could paint all 4 edges without having to lift up the door. 

Note 1: when painting the edges I always had to wipe the underside of the door to remove any extra paint that overlapped onto the bottom - this way I wouldn't end up with some unsightly overlap lines. I wore rubber gloves and wiped the paint onto my pants. I started out using rags, but it was just easier to use my pants. Those pants could now stand on their own...literally because they are so stiff from the dried paint!

Note 2: I used Benjamin Moore's ADVANCE Waterborne Interior Alkyd Paint. It self levels much better to a smooth finish. Brush strokes are barely noticeable

Note 3: Talking about brushes...buy a good brush - expect to pay $14-$18 for a 2.5" angle brush. A cheap brush will ruin your paint job, no matter the brand of paint...and if you are going to spend the money on B.Moore paint - you obviously care about the finished product so don't ruin it by using a cheap brush. FYI if taken care of properly you can us the same brush for multiple projects.

Step 13 - Drawer Pulls


The key to nice looking drawer pulls are:
  • centered, 
  • leveled and 
  • evenly spaced from drawer to drawer.

In order to achieve the above you must create a template (well must may be an over exaggeration - but it sure will make your job a hell of a lot easier!). Once your template is perfect - so will be every drawer pull!

Here is how I made and used mine:

Kitchen Renovation - Refacing Kitchen Cabinets - Drawer Pull Template
Make sure the guide lip on the back is level with the your guide holes
and the distance between the lip and holes are the desired distance you want the pull to be from the top of the drawer.

Kitchen Renovation - Refacing Kitchen Cabinets - Drawer Pull Template
Make a Center Line (on the tan masking tape)
Kitchen Renovation - Refacing Kitchen Cabinets - Drawer Pull Template
Rest the guide lip on top of the top of the drawer,
line up the center line on your guide with the center line on your drawer front,
then clamp in place. Drill your holes. Perfect every time.


Kitchen Renovation - Refacing Kitchen Cabinets - Drawer Pull Template
Step 14 - Hang the Cabinets and Knobs

Kitchen Renovation - Refacing Kitchen Cabinets - KnobsDefinitely a chore in and of itself. It is not easy to get everything to line up. To make your job easier make sure your new hinges have slotted holes so you can make slight adjustments up and down. You will also need to adjust for plumb. Every style of hinge will require a different process to make sure every door is level and plumb.

As for the knobs - just make sure they are all even and level (on the same plane) with each other.


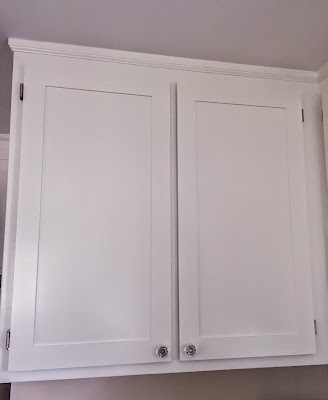
The After Pictures

Kitchen Renovation - Refacing Kitchen Cabinets - Knobs - Hardware

Kitchen Renovation - Refacing Kitchen Cabinets - Knobs - Hardware

Kitchen Renovation - Refacing Kitchen Cabinets - Knobs - Hardware

Kitchen Renovation - Refacing Kitchen Cabinets - Knobs - Hardware

Kitchen Renovation - Refacing Kitchen Cabinets - Knobs - HardwareKitchen Renovation - Refacing Kitchen Cabinets - Knobs - Hardware

Kitchen Renovation - Refacing Kitchen Cabinets - Knobs - HardwareKitchen Renovation - Refacing Kitchen Cabinets - Knobs - Hardware


Side by Side Comparison

Kitchen Renovation - Refacing Kitchen Cabinets - Before & AfterKitchen Renovation - Refacing Kitchen Cabinets - Before & After

Kitchen Renovation - Refacing Kitchen Cabinets - Before & AfterKitchen Renovation - Refacing Kitchen Cabinets - Before & After


So after almost 5 months this stage of the kitchen renovation is finished....the next stage...counter tops will have to wait...wedding season is upon us so Splendid Stems will be very busy these next few months...and we don't even know what material we want yet! (well actually we both know what we want - but we both want a different type of counter top). So wait we will. In the meantime I will start knocking off some other great projects. Stay tuned.

Monday, April 27, 2015

Kitchen Renovation #3 - Wallpaper Removal, Painting and Light Fixture Replacement

Before Pictures

2 words - Wow! Fugly!
kitchen renovation - wallpaper removal - light fixture replacement

kitchen renovation - wallpaper removal - light fixture replacementkitchen renovation - wallpaper removal - light fixture replacement

It really is amazing when you think about it. Just how much you are willing to put up with when you find "THE house." It's hard to believe - that with a kitchen like this - we still truly had to fight tooth and nail to get this house. We had a contract, then we didn't, but we knew we did. We hired lawyers. It was a mess. But in the end cooler heads prevailed. It was going to be ours.

Karen LOVED the house and saw its full potential. What did I see?...my "free" time going bye-bye. Don't get me wrong - I loved the house too - but knew what it would take to reach that potential. With that said - its potential has not been reached - but we are a step closer.

The first things we did in the kitchen were wallpaper removal, painting and changed the light fixtures...back in March 2014!...yes I am just writing about it now - a year later - I did not want to reveal anything in the kitchen until I was done. The reason I kept it a 'secret' is because I didn't want to hear "did you finish the kitchen yet?"....because I knew I was going to take a 7 month hiatus to do other projects.

Kitchen Walls & Lights

Step 1 - Goo Gone - Oh my - I really wish I had a before picture of this vent fan. I honestly thought it was a black fan. I was surprised when I de-yuckified it and found out it was silver.

kitchen renovation - wallpaper removal - light fixture replacement

Step 2 - Karen's Handy Work
Karen is always to first to start the wallpaper removal in any room....usually a few weeks/months ahead of when I planned on doing the work. ;-)  Karen goes around and rips off any pieces that come off easily. Look at the first 3 pictures of this blog entry for what I mean. She does this to see if it will be an easy job or not...(and to make sure the project gets higher priority on my Honey Do list).

Step 3 - Change the Light Fixtures
kitchen renovation - wallpaper removal - light fixture replacementNormally I would have finished the wallpaper and painted before changing any lights - but we could not handle the florescent light fixtures anymore. As if the cold "work place" ambiance was not enough - they were also falling off the ceiling...in case you think I am exaggerating check the picture to the right.


Changing a light fixture is not all that difficult - but hire an electrician if you must. I hired one for the first light fixtures we changed in our previous home. I watched what they did and since then have been doing it myself.
  • Turn off the electricity to the fixture at the circuit breaker - MOST IMPORTANT
  • Remove old fixture
  • Disconnect wires
  • Read and follow instructions on new fixture
  • Reconnect wires - black to black; white to white; green to green
  • Make sure all connections are secure
  • Turn on electricity
kitchen renovation - wallpaper removal - light fixture replacementKeep in mind if you are changing to a ceiling fan or the old wiring in your home is frayed or you do not have a grounding wire you may have additional steps...or hire an electrician.


We chose Schoolhouse Pendant lights. Sorry for the less than stellar pictures below...they really look nicer in person than in the pictures...and there are better pics at the end of this entry in the After Section.

kitchen renovation - wallpaper removal - light fixture replacement

kitchen renovation - wallpaper removal - light fixture replacementkitchen renovation - wallpaper removal - light fixture replacement

Step 4 - Remove Wallpaper

The day I removed all the wallpaper from the kitchen was less than fun. 8 hours of prep including paper tiger-ing, spraying the walls, scraping, scrubbing adhesive and washing and re-washing. After-all a good paint job starts with good prep work. My Little Helper, Lily (6 years old at the time), was by my side for at least 6 hours of it asking, "Is it my turn yet?" She was very excited to learn how to spray the walls with the pressure sprayer and then scrape the wallpaper off.

She quickly realized it was a wet job and disappeared and then returned with this work uniform.

kitchen renovation - wallpaper removal - light fixture replacement

Wallpaper Removal
  • Peal off as much as you can by picking a corner and peeling
    • With any luck all of your wallpaper will come off like wrapping paper
      • I have had several rooms in my old house come off like this - primarily the better wallpaper (more like a fabric than paper)
  • If the wallpaper has been painted over - all bets or off - or if your wallpaper just rips (like in the first 3 pictures of this entry) then you need to take a Paper Tiger to the walls.
    • They are cheap and available at any hardware store, home center or paint store
    • You roll the Paper Tiger over the surface scouring the surface of the paper (leaving thousands of tiny holes in the paper).
  • Using a pump sprayer (can be found near the insecticides and lawn care products at any home center) - fill the sprayer with hot water and some fabric softener
    • Spray the wallpaper until thoroughly wet. You may want to protect your floors with old towels (never throw out a towel - save them in a sterlite container for home projects)
  • Wait 15-30 minutes - let the mixture work its magic - the longer you wait the easier it will be
    • I usually Paper Tiger and spray the next wall while I am waiting on the current wall
  • Use a putty knife (1.5" to 3" I find works best) to scrape off the paper
    • Take off the easier stuff
  • Re-wet, wait, scrape again - repeat until all paper is gone
  • OK so the paper is gone...but you are not done yet! Just because the wallpaper is gone does not mean the wall is clean. If you touch the wall it will feel slippery/slimy. It is the wallpaper adhesive that is now wet.
    • If you try to paint over the adhesive it will bleed through your paint and ruin your paint job!
    • Spray the walls again.. Use your putty knife to get most of the adhesive.
    • Then use a wet scotch brite pads to get the rest.
    • Then wet a towel and clean off the wall.
    • When you are done the wall should look and feel clean
  • The final step is to fix any cracks or fill any holes with joint compound- let dry - sand - tack cloth the loose dust.

I know this sounds like a lot of work - and it is!

Want proof?

Just look at how crazy Lily was by the end of the day!


       ...she really does make hard work a lot more fun!


Step 5 (well really Step 34 if you include every step of wallpaper removal as its own step) - Remove the Back Splash

    kitchen renovation - wallpaper removal - light fixture replacement
  • Rip off the backsplash any way possible (ours was formica). 
  • Remove as much adhesive as possible with a putting knife. 
  • Skim coat the areas with joint compound
  • Sand smooth
  • Use a tack cloth to remove the excess dust to prep for paint
Note - the skim coating/sanding is just because we are painting the backsplash temporarily as we decide what type of countertop and backsplash to install in a future project.
kitchen renovation - wallpaper removal - light fixture replacementkitchen renovation - wallpaper removal - light fixture replacement

For you NFL Football fans - Much to the chagrin of this Pittsburgh Steelers fan - somehow the Baltimore Ravens logo ended up on my wall. It was not by design - the pieces just came off like this.

kitchen renovation - wallpaper removal - light fixture replacement
As with most home renovation projects...
...part of making things look better is to first make them look worse.

Step 6 - Paint
Lily by my side again - now 7 years old
  • 1 coat of Benjamin Moore primer
  • 2 coats of Benjamin Moore Ceiling White on the ceiling
  • Two coats of Benjamin Moore White Dove (satin finish) on all the crown molding, trim work and doors. I used their ADVANCE Waterborne Interior Alkyd Paint. It self levels much better to a smooth finish. Brush strokes are barely noticeable.
  • For some contrast we chose Benjamin Moore Navajo White (Regal Select Eggshell) for the walls.


Did I mention that Lily is My Little Helper?! Watch out Nicole Curtis! Lily will be ready to take over for you when you hang up your tool belt....

If you don't watch it...I highly suggest watching Rehab Addict on HGTV. Great show. Lily loves watching, too. Lily thinks Nicole is cool and makes ugly houses look pretty...and you know what - she's right!


In the above pictures - Lily is painting the refrigerator nook. We had to protect the wide plank pine floors before rolling the refrigerator out of the kitchen. Here are some pictures of that process.


The After Pictures

kitchen renovation - wallpaper removal - light fixture replacement

kitchen renovation - wallpaper removal - light fixture replacement

kitchen renovation - wallpaper removal - light fixture replacementkitchen renovation - wallpaper removal - light fixture replacement

kitchen renovation - wallpaper removal - light fixture replacement

kitchen renovation - wallpaper removal - light fixture replacement

kitchen renovation - wallpaper removal - light fixture replacement

The kitchen is looking better.

My next entry (coming soon) will show you how I refaced our cabinets using the original doors. Truly a total transformation!