
I started the kitchen 13 months ago...but took April thru November off (to do the many outdoor projects). I have been back working on the kitchen since December (with a week or so off at Christmas for good behavior). I finished ripping out the linoleum, sanding and refinishing the floors in January. Then got to work on refacing the cabinets myself (entry coming soon) and making a few other personalized touches from Karen's Pinterest boards (also coming soon).
If I was smart I would save the best for last...but to hell with that! I LOVE the way this shelf came out so I just couldn't leave it until end!

 Broken, old, ugly and gross. A new oven was top on our list of purchases. It goes without saying we used our gas grill a lot that first summer. But by the end of August we had purchased a beautiful range from Earl B. Feiden in Clifton Park - the Verona 36"
Pro-Style Dual-Fuel Range.Up until now I have yet to unveil a full picture of our new range and in that spirit the picture to the right is not a great picture of the range, either. You will have to read the whole entry to get to those pictures!
Broken, old, ugly and gross. A new oven was top on our list of purchases. It goes without saying we used our gas grill a lot that first summer. But by the end of August we had purchased a beautiful range from Earl B. Feiden in Clifton Park - the Verona 36"
Pro-Style Dual-Fuel Range.Up until now I have yet to unveil a full picture of our new range and in that spirit the picture to the right is not a great picture of the range, either. You will have to read the whole entry to get to those pictures!But this pictures does give you a great "before" picture. The lovely wallpaper, Formica back splash and oh-so-classy exhaust vent cover - a place mat held on with magnet clips!
The two shelves were a tag sale find by Karen. She has a knack for deals. $2 for 2 real wood shelves with routed edges and all. They were functional and nice looking, but not Pinterest board worthy. BTW - I just started my own Pinterest account - it is still in its infancy - but now is a good time to get in on the ground floor!
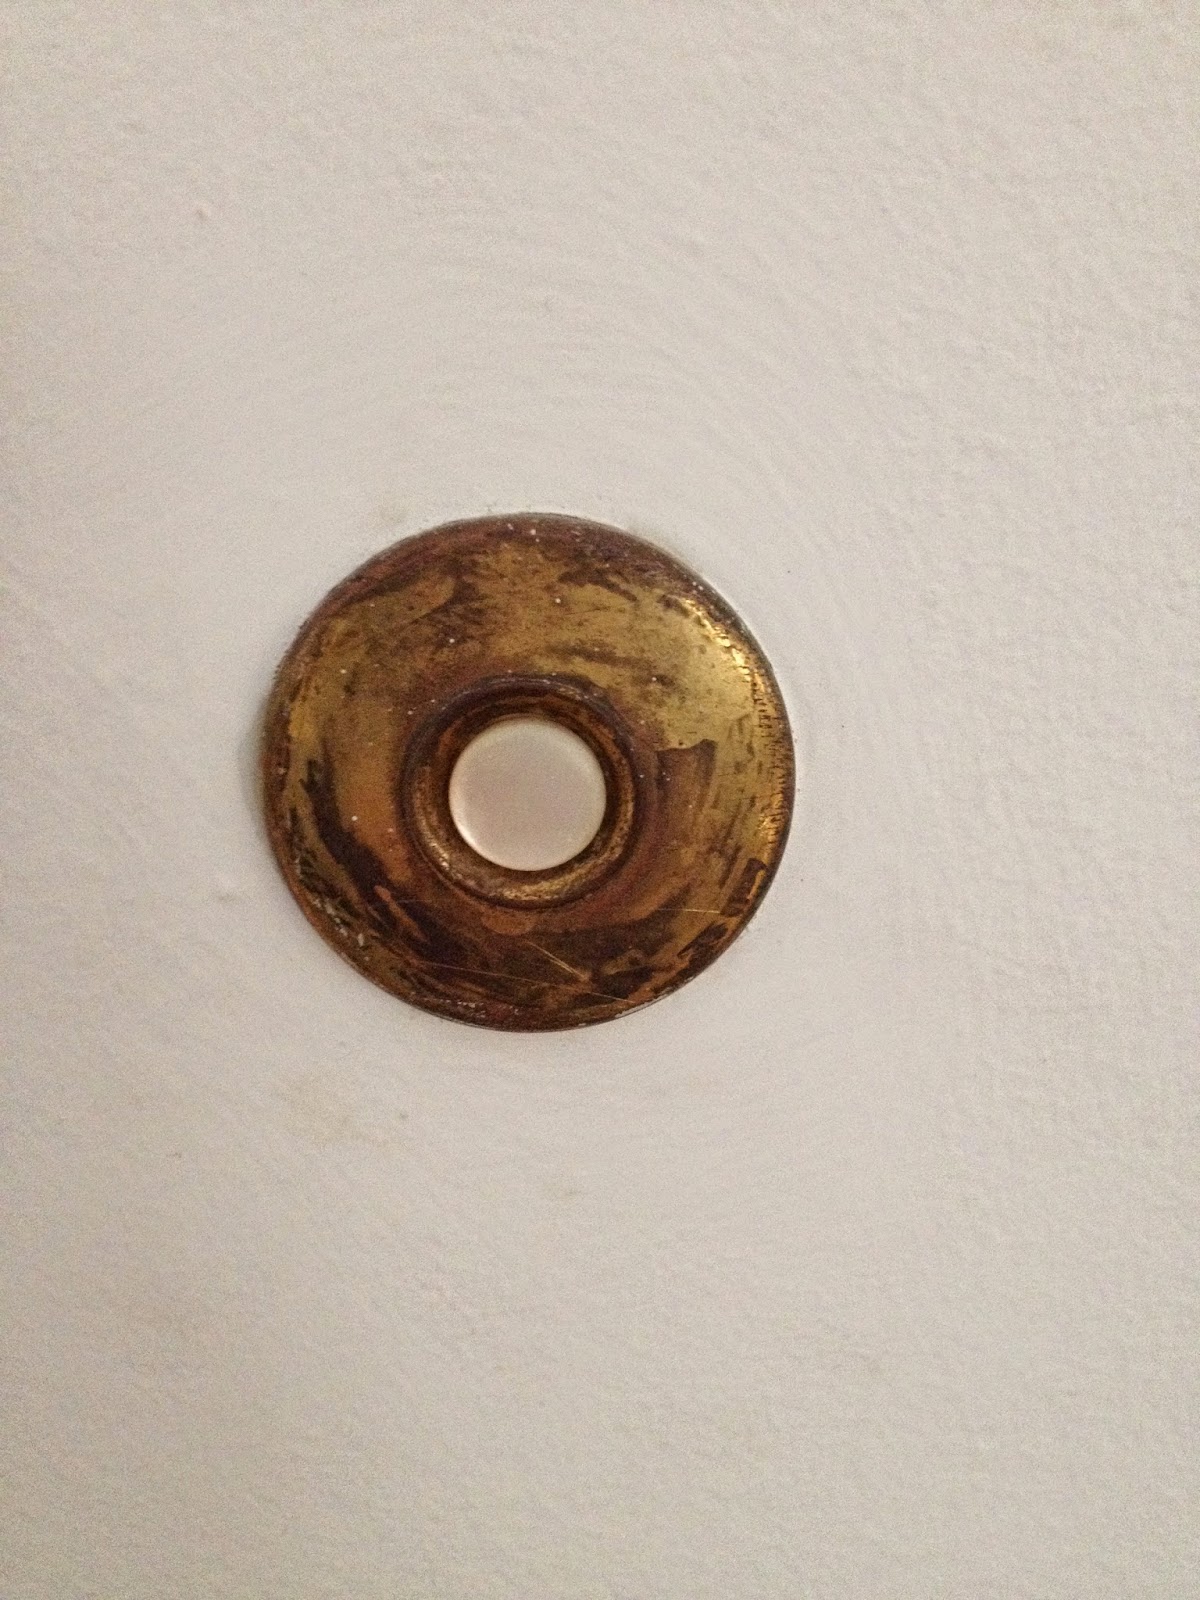
If you look carefully at the above picture you can see a rectangular plate in between the two bottom shelf brackets covered by wallpaper. Under the wallpaper we found it was painted. When we removed the plate we realized there were 6 tiny glass panes (2 rows of 3). If they had not been covered they would have revealed these!

Back in the day - you could summon the help - from one of 6 different rooms and they would get buzzed in the kitchen. The help would look at the panel and see what room required their assistance.

So are you still with me? Now to finally get on with the Range Shelf entry....
Building a Decorative Range Shelf
Step 1 - Pin your Inspiration
This entry will show you if you find something you like - Pin It. Yeah sure Karen has this in her Pinterest Board, but even more - I printed it and Pinned It to the wall behind the stove...12 months ago! I have been staring at this picture for a year just waiting. See I HATE painting (this surprises people, but as I like to say, just because I do it a lot (out of necessity) and am good at it (because I do it a lot), doesn't mean I like it. But I LOVE building things. I knew I had to paint all the walls, trim and cabinets first - and only then my reward would be being able to buy some slabs of wood and get to work building this...

The picture on the left was pinned to our wall for a year. The picture on the right are my "directions" All I has were these pictures, a few sketches, handwritten notes and my carpentry tools.
Step 2 - Buy the Wood
I purchased solid wood slabs that were 3/4" thick. Glued pine boards for the sides, front, back and top. A hardwood plank for the shelf. Since I was painting the finished product I could save big money by mixing woods. You cannot do this with stained finished products. Also it keeps the weight down when you can get away with using pine. Important when hanging an object that is going to jet straight out from the wall. I purchased a length of crown molding and 1/2 round trim, too.
Step 3 - Make your Cuts


Step 4 - Glue and Nail and Clamp the Main Structure
 I attached the pieces with glue (I am loving Titebond II Premium Wood Glue in the round "burger joint" style bottle - good enough for Tom Silva - good enough for me) and my brad nailer. The small pin holes of these nails are practically invisible and very easy to cover with spackle. Combined with the glue - the wood will break before the seam will separate. I clamped the structure in various areas to make sure the seams were tight. Hint: do not over tighten your clamps. You do not want to squeeze out all the glue. Also protect your wood from the clamps by using scrap wood buffers.
At this point a few people thought I was making a Toy Box when I posted this picture to my Facebook page.
Crown Molding and 1/2 Round turned nice into spectacular

Note: for the shelf - I ripped a 1.5" strip from the 12" wide board and glued and nailed it to the front of the shelf. It served two purposes: appearance and integrity. It gave the shelf a thicker, more appealing profile and also gave the shelf more lateral strength to prevent future sagging.
Step 6 - Spackle (Joint Compound)
Fill in all the nail holes and any imperfections

Step 7 - Sand Smooth
Orbital sander with 220 grit the flat surfaces and hand sand the round surfaces with a sanding sponge.

Step 8 - Paint
I balanced the shelf on its back on top of paint cans so I could paint all exposed surfaces at once.

Step 9 - Protect the Shelves
I applied 3 coats of MinWax Polycrylic (Satin finish) to the shelf and top. It dries crystal clear and protects like a polyurethane without the poly's amber color.
Step 10 - Hanging the Shelf
Making a structure like this is only half the battle. You have to hang it from the wall securely. Gravity wants to bring it down! In my picture in Step 1 above you can see my primitive drawing of a wall cleat. I know there had to be something I could buy. I found The Hillman Group 18-in Hangman Picture Hanging System (above the back-splash in the picture to the bottom right) It was perfect. Easy to use. Comes with a built in level. Can hold up to 200 pounds. Cost less than $11....and it allowed Karen and I to easily mount it and feel safe to let it go, check it out, make adjustments, take it on and off at will and then reinstall. So easy. The mounting system that is. The process in a whole was a PITA! After testing the shelf until had it in the perfect location, I had to make some pencil lines to mark the exact bottom so I could install the back-splash to the correct height. So off came the shelf again.
Step 11 - Install the Backsplash

Step 12 - Rehang the Shelf

Step 13 - Roll the Stove Back in Place
 In my last post about restoring the wood floors in the kitchen, I wrote about my ingenious (if I do say so myself) way I made my stove a permanent set of wheels for the past year.
The After Pictures

Not bad for less than $70 in total costs (including the hanging bracket). The shelf, along with the range, definitely gives this section of our kitchen a much need oomph!


The Verona 36" Pro-Style Dual-Fuel Range in Antique White
Italian Made - European Styling - Available is 5 colors
We love it! However, now we need better cookware made to handle it's power.

WOW - project coming along great!!!! Wonderful workmanship.....patience to all working in the upheaval......congrats and keep posting!!!
ReplyDeleteThank you for choosing Earl B Feiden for your appliance purchase! The Verona range looks beautiful in your new kitchen!
ReplyDeleteThe longer I look at the pictures of your remodeled kitchen, the more I believe the shelf you made was really meant for your stove! I really like combination you chose, it was like a clash of vintage and modern steel. Very contrasting, but it worked well in the end. Anyway, thank you for sharing!
ReplyDeleteBert Aguilar @ RainFillTanks
Very Nice Post, Thanks For Sharing.
ReplyDeletepet gate
Nice one with the Range Shelf. Thanks for sharing this. Much appreciated for your efforts.
ReplyDeleteKitchen Renovation Sydney
This Blog is very informative and useful for us. It's helpful for me. Kitchens renovations in Sydney
ReplyDelete