Old House Restoration

A real family makes an old house their home...for the 2nd time
The Splendido's renovate, restore and rejuvenate their home with their own hands - all while living in the house
and balancing their family needs...you know...like most families have to do it!

Friday, September 12, 2014

Every project WILL take longer than I think!

Let me save you some time, energy & money. When painting, if you ever wondered if you can skip priming when painting wood....the answer is an unequivocal, "NO!"

I could end this post now, because that is moral of this story. However, we all know that won't happen, because then it wouldn't be one of my excessively detailed (and hopefully partially entertaining) posts.

Now you may be thinking to yourself, "well duh John, of course you need primer on raw wood"...but in my defense, I thought I had this job well planned out, but then like all projects, Murphy's Law grabbed a hold of it and it grew and changed by the minute.

Winter Prep of Exterior Siding

Before
After vacation, we really wanted to get back to working on the kitchen...however, unfortunately I have this ever-lasting nagging "To Do List" of outdoor jobs that I want to accomplish before winter sets in. These projects have resided on a various Post It notes stuck to a kitchen cabinet (classy!) for many months, and in one case a full year! *slacker*

All these projects are what I consider necessary evils. They are not flashy or sexy. Nobody gets excited about the finished product (except me...because I finally get to strike-though the item on those pesky Post Its). But if I don't do them the house will get run down looking...or worse...a chipmunk could lose its life (literally - more on that is a future post).

The first of these projects was repainting two sections of the exterior of our house. These two portions looked a little more weathered than the rest of the exterior and I was worried another winter would be detrimental to the old clapboard beneath...and they just happen to be very prominent from my hammock and new slate patio - so whenever I did get a moment to relax, I found myself looking up and saying, "ugh!" But in looking it over from the ground I figured it was nothing a little scraping and a new coat of paint couldn't fix. A few hours in one day. No big deal.


Step 1: Scrape any loose paint (Day 1)

I really thought it would just take me a few minutes to scrape the loose paint, however as I was climbing out my our bedroom window onto the roof to get a closer look two things happened:
  1. I remembered I am not a big fan of certain types of heights. Roofs are one of them. I love roller-coasters and any other scary amusement park ride that bring me a few hundred feet in the air, but put me 10 feet up on a roof and I am not comfortable.
  2. The paint looked much worse up close than I thought (see below picture)


As I started scraping, full sections of paint were just crumbling to the tarps I laid on the shingles.... and then as I continued to scape...even more paint chipped away...


...and then even more paint came off...

Paige keeping an eye on her daddy...she even brought me water and cookies to keep me hydrated and nourished

My initial thought was just to do the easy sections I could reach from the porch roof...however then I looked up and realized the area outside the attic was in horrible shape, too...as the fear of getting up to that height started to set in, I had a great idea. I will just take the attic window off the hinges and work from the window!

Attic-window-paint-scraping-selfie


Here is the after scraping picture. Note: save yourself some sweat and heartache when scraping - instead of trying to get every last piece of paint off - just try to get the loose stuff off - especially if working on the 2nd floor. You will not notice any imperfections from the ground or from far away. Embrace the imperfections! They just add to the "character" of an old house!

Step 2: Paint (then realize you should have primed first) (Day 2)

There is only one scenario that I can suggest not using a primer. If you are re-painting over a paint that is the same color and is not a high gloss finish. Other than that, a primer should be used in all other scenarios. If you try to skip the primer - in the end you will have just found out that you wasted a gallon of paint - to then have to go back to Benjamin Moore to buy primer and another gallon of exterior paint.

I really expected to be in the "non-primer needed scenario." Originally I did not think so much paint would scrape off. I figured a little loose paint would come off and I would just paint right over the current paint -which was the same color and a flat sheen. The perfect scenario for skipping a primer....and just to be safe - I purchased a Benjamin Moore exterior paint that said it was "self priming on most substrates."

Of course more paint scraped off than I planned. I even mentioned to Karen my concerns, but after contemplating whether I should prime or not - I decided to test the self-priming characteristics of the B-Moore paint.
Wrong! While I was applying the first coat of paint - it may have just been my imagination playing tricks on me - but I really thought I could hear the slurping sounds of the paint being sucked into the exposed portions of our 1938 clapboard siding.


See all the uneven spots - the paint was sucked right into the wood - it looked like crap


Working hard from the attic window - all for naught. Looks terrible!

Even though the result was bad and it was going to take me longer than I expected...and cost more than I had budgeted - I did take two positives out of this unsuccessful first try:
  • Through some creativity I realized I can paint a lot of area without having to get too dangerous
    • Between hanging out of windows, extension poles and duct tape (what can't it be used for) I was able to reach all the nooks and crannies.
      • Especially proud of taping the paint brush to the end of my 8 foot extension pole and getting to the corners like I had Stretch Armstrong arms.
  • This small section acted as a great test area before tackling the whole house next year!
    • i.e.- I learned what not to do

Step 3: Prime with a REAL primer (Day 3 - the following weekend)

I went back to Benjamin Moore with a cell phone picture and explained what had happened. They said you definitely need a real primer (i.e.-not a paint that says it is self-priming). So they tinted a gallon of their Fresh Start Interior/Exterior Primer a dark grey. They said primer does not take browns very well - he said it turns pink - so the dark grey would be my best bet.

After applying the primer I could tell it was going to work. The primer was staying on top of the wood. It was not being sucked in. The can said it needed 4 hours to dry before you could paint over the primer so...

The twins and I headed over to Home Depot at 9am (yes I was done with the primer by 8:30am...I started at 6:30!) for a little birdhouse making! After all - the most important question to answer EVERY day is: "What are we going to do that is fun today?"

Future home improvement experts in the making

Step 4: Paint the Exterior of the House (Day 4)

By now I was becoming an expert at painting this section of the house. I painted the first coat in the morning and then we went on a family bike ride. That afternoon I painted the second coat (which is really the 4th coat of paint since the prior weekend!).

So it took me longer and cost me a little more than I planned, but in the end the paint looks nice and even. I am happy with the result...or course now it makes the adjacent sections of the house look worn out...I feel like a dog chasing its tail!


Now Karen and I need to figure out what color to paint the trim next spring/summer. We dislike the yellow (to put it nicely). Also the remainder of the house will get painted next year...we think we will keep it brown (Benjamin Moore Night Horizon to be exact), but not positive...let me know if you have any suggestions for the trim work or all new color schemes! We want to keep the color in character with house and the woodsy setting, but are open to suggestions.

Saturday, September 6, 2014

Vacation over...To Do List minimizing commenced

I haven't forgotten about the blog...and I definitely have not gotten lazy! Busy, busy, busy as ever here in Splendido Land. Vacation, back-to-school, winter house prep...so much going on. I have no less than 4 projects going simultaneously....and not one of them complete! To be honest - it is testing my Type A personality a little bit. I like to finish one before I start the next...but between weather, work and family...the logical order is not always possible.

We took our annual pilgrimage to Cape Cod. It was so fantastic to just hang with the kids for 12 straight days. So.Much.Fun.

Sand Sofa on the Beach

Annual Photo
This Hydrangea Bush used to look a LOT bigger


Whale Watch off of P-town


...and as soon as we finished vacation...it was time to get ready for.....

the 1st Day of School!

Even though we had all this going on...I have still been starting a lot of projects. My before winter comes "To Do List" has a few items on it. Karen wants me to get back to "making pretty" inside the house, but we both agree we need to get a few more projects off the list first...

...BUT none of them a quite finished...I'll post project entries soon...but here are some teasers!

The custom pottery we collect during vacation....instead of refrigerator magnets!

 This boy's toy!

 I wonder what lived in this hole

  Scraping & painting the exterior...as one of my fans and supporters look on


Proof that I have found time to squeeze in some hard work amongst the late summer fun...this selfie was taken while hanging outside the attic window scraping badly weathered paint...fyi...I am not a big fan of heights (unless it is a roller-coaster...love them!), but sometimes a man's got to do what a man's got to do.

Hopefully I can finish up a few of these projects this weekend and start making pretty again soon. The kitchen floor and cabinets are calling my name...I think I heard them saying "John refinish me."....oops...actually that was Karen doing voice-over work.


Tuesday, August 19, 2014

If You Want to be on Daddy's Blog then...

Let me just tell you - LILY IS SO FUNNY!.......and SERIOUS!

Two days ago My Little Helper, Lily, whispered in my ear that "she needed to talk to me in private." So we went upstairs and she went on to tell me what was on her mind. Then we went about our day.

Later that evening, while the whole family, including Mimi & PopPop, were sitting in the living room, Lily turned to me and said, "So tell them." I said "not right now, because we are trying to relax." She said, "no you need to tell them."

This of course led to Paige, Luke and mommy all asking, "Tell us what?"

After few more minutes of good natured suspense...I talked Lily into telling them.
Lily went on to explain in her sweet, but very serious, manner that "If you want to be in daddy's blog then you have to REALLY help. You just can't show up, take a picture, then leave and go back to playing on a tablet or watching TV or something and expect to be in daddy's blog. Because that is not helping. That is not fair to me and daddy. We are working hard to fix the house and you just can't show up and take a picture and expect to be in the blog."
We all just looked at each other with a mixture of surprise and adulation on our faces. She is really something else!!! For years now Karen and I (and her teachers) have all said Lily is going to be a Judge some day, because "being fair" is of the utmost importance to her. She is always quick to point out any injustice - no matter if it is the classroom, living room or on the playground.

So what brought this on? Paige and Luke have been feeling a little left out recently, because my blog has so many pictures of Lily helping me with the household projects. I explained that Lily truly enjoys learning how to work on the house and is by my side from start to finish of almost every project. Therefore she has had more picture opportunities. These complaints from her siblings have obviously been festering in Lily's "in justice for all" mind...which led to this little proclamation.

So when I asked yesterday, "Who wants to help daddy put up the tent?" I received the usually "Me!" from Lily. I also heard a few "Will I get in your blog?" from Paige and Luke. So when I said "Sure" I suddenly had more than my share of help!


Paige and Luke were there to help at the beginning stages of the project.


Lily, of course, was there until the bitter end (only 15 minutes later).
Her prize? Getting a few extra pictures in daddy's blog...
...and being the first to go inside the tent!


I'd be remiss to not mention my other little helper on this day.
He has been a big help in quite a few of my home projects over the years.
Thanks PopPop!

Friday, August 15, 2014

Original Paperwork from February 26, 1938

The son of the owners of our house from the 1950's through 2011 dropped by to say hello one day. He was glad to see a family moved into the home that loves the house as much as his parents and siblings. They like the work we were doing on the Breakfast Nook & Butler's Pantry at the time. He also told us that the Moravian Star I restored and installed came from his grandmothers house. 

Beside stopping by to just saying hi and see if the house was in good hands, he and his family came bearing gifts. Some in the form of stories about the house and others in the form of cool old artifacts that belong with the house. The coolest of which is the original Waiver of Lien for the house.

This paperwork lists every single, contractor, laborer, mechanic, dealer and company that had anything to do with the building of 930 St. Davids Lane. Paul Schaefer may be known as a master builder, but it obviously took quite the team to build his fantastic, awesome, beautiful and charming homes.

You should check out the list - ESPECIALLY if your family has lived in the Niskayuna/Schenectady area since the 1930's or prior. There is a good chance you may recognize a last name or two.


Some notables that I have noticed (please feel free to let me know if you recognize anyone I will update the post):
  • Leslie Nie - Orginal owner of the house
  • Paul Schaefer - Master Home Builder and Conservationist - more on him in a post coming soon.


  • Carl Schaefer - General Mason and Flagstone Path - per my research there was a certain snooty factor if your house has a Carl Schaefer Fireplace in the basement. I am glad to say we have one in our basement and it is absolutely beautiful! It really is one of My Favorite Things (along with raindrops on roses, crisp apple streudels and wild geese that fly with the moon on their wings) in the house.
Can wait to rip up the carpet some day and find the hearth so we can use this one again.

Any chance you have a Carl Schaefer Fireplace in your basement?


I would like to thank the Lange family for sharing these invaluable papers with us and sharing their stories. It was great meeting them and learning some history about the house.

Wednesday, August 6, 2014

Another boring thermostat...or is it?!

So of course when you are installing a new state-of-the-art heating and air conditioning system, it would not be complete without a new state-of-the-art thermostat....BUT...never mind "would not be complete" - because the many benefits of the new system will NOT be realized without a new thermostat...AND never mind the name "thermostat"...these new "thermostats" do SO much more that they are now called "controllers."

They no longer just determine how hot or cold your home is...they control the quality of your indoor environment!

Nostalgic Moment: Remember when all you needed was one of these?

How to change my thermostat to a programmable thermostat

Enviromental P.S.A. - When you take that round dial off your wall to replace it with a Controller - remember there is mercury in that round dial - so they must be properly recycled. Luckily a new law makes this process easy. All home centers (and any place you can buy a new thermostat/controller) must have a thermostat recycling bin. Easy peasy lemon squeezy.

Why Replace Your Old Dial (or any non-programmable) Thermostat
This is easy. Save Energy = $ave Money. Per Energy Star a properly used programmable thermostat can save you up to $180 per year on energy costs. Also, through 12/31/14 you can receive a $25 rebate from National Grid for installing a programmable thermostat. In most cases your payback will be less than a year. It really is a no brainer. Also if you are only changing the thermostat - it is usually a very easy process...unless you are like me who had to get one with ALL the bells and whistles...even that install was pretty easy.

How to Replace Your Thermostat
In the age of iPhones and everything Tech-Geeky - of course I selected an controller that has a touch screen, is WiFi compatible so I can control it from anywhere in the world, and takes all the guess work out of Home Comfort. I selected the Carrier Infinity Touch WiFi Controller.

Step 1: Remove the old thermostat

Step 2: Run a new thermostat wire


Many of the old thermostats only had two wires. Whereas, some of the new controllers use thermostat wire that have 4 wires. After-all you need more wires to control more aspects of your indoor air quality.

NOTE: if you are installing a basic programmable thermostat it is very possible you will not need to do Steps 2, 3 or 4. It depends on how many wires the new stat requires.
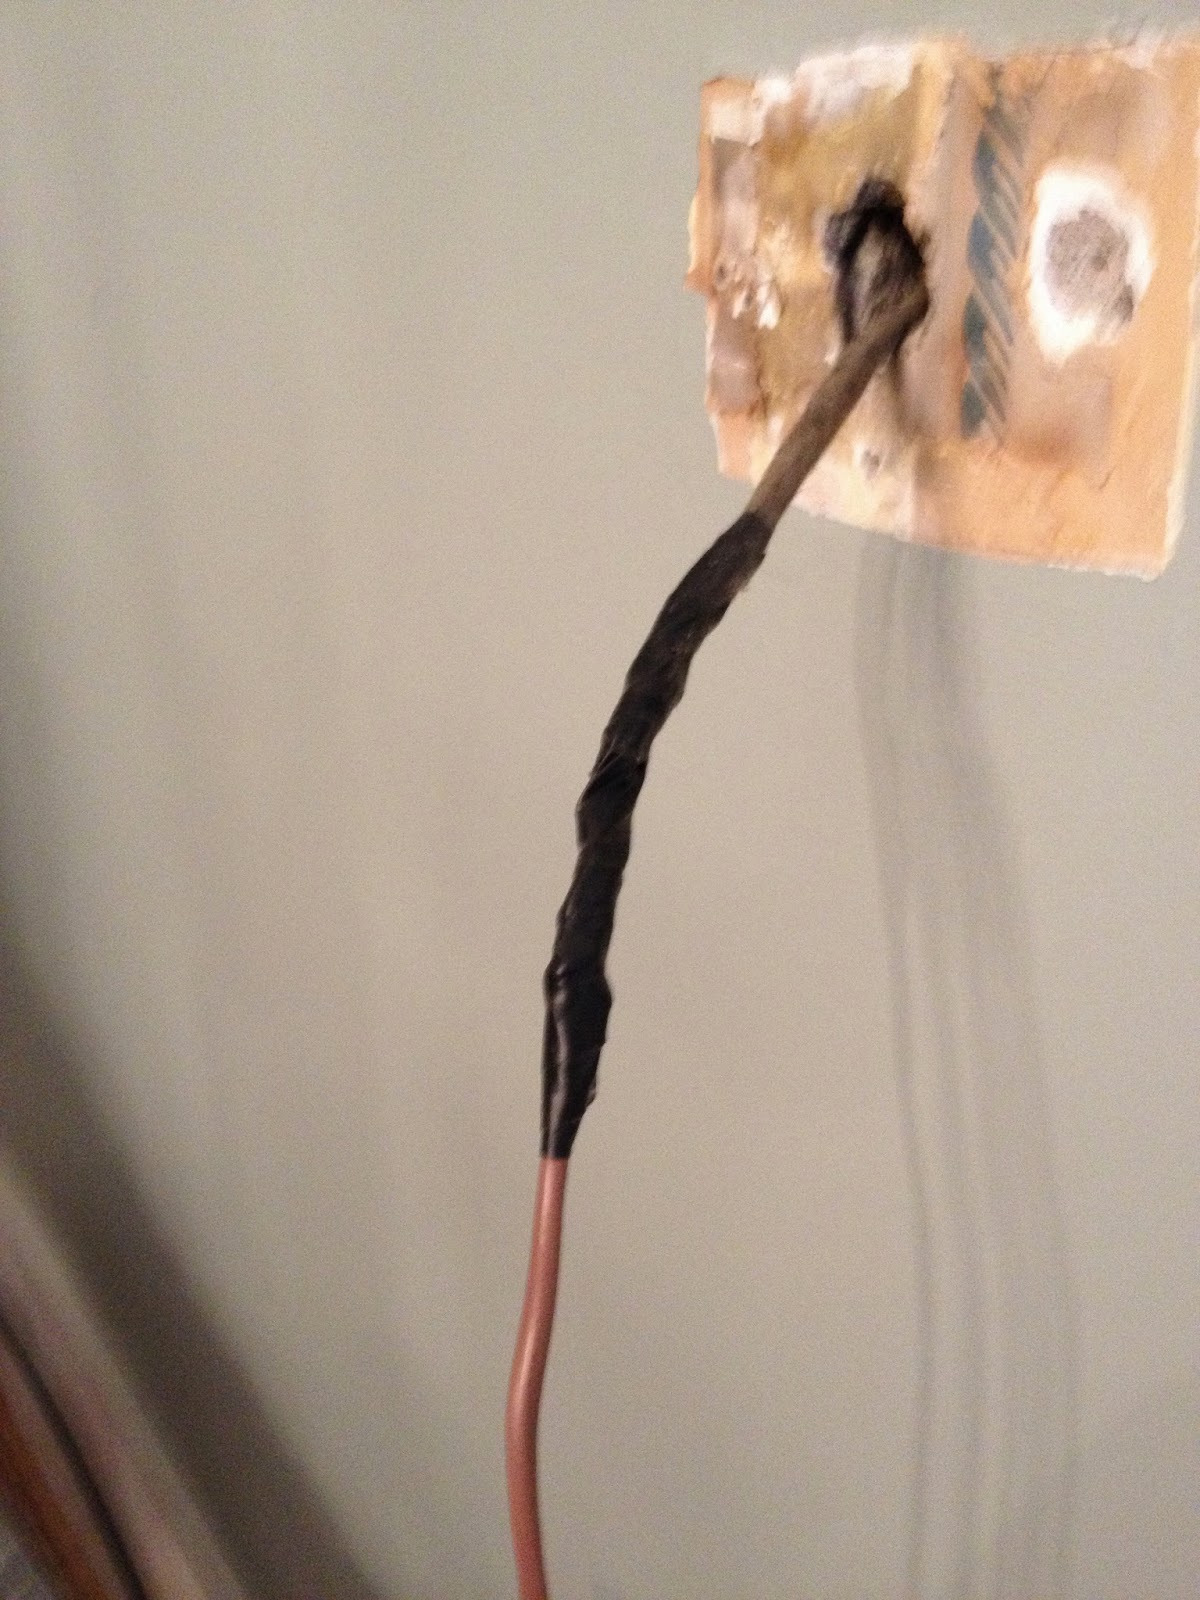
  • After you remove the old thermostat you should have some of the old wire sticking out from a hole in the wall. 
  • Disconnect the old thermostat wire from your furnace/ac if you have not done so already - do not pull it out of the wall yet!
  • You need to connect your new thermostat wire to the old wire by wrapping/twisting the wires around each other - then taping the ends together - making smooth transitions so there are no bumps that will get caught during the next step
How to chnage my thermostat
  • Have Paige hold the spool of new wire with a pencil through the middle so it will roll out nicely during the next step - it is so nice to have help!!!


How to change my thermostat to a programmable thermostat
  • Go downstairs (or wherever your old wire goes from your thermostat location) and look for the thermostat wire
  • Hopefully yours does not come out from under your return ducts like ours did.
  • I had to disassemble a portion of the return ducts so that Lily could perform the next step
  • Have My Little Helper Lily pull on the old thermostat wire until enough of the new wire is available to reach your furnace and then to the outdoor condenser....important - make sure there is at least a few inches sticking out of the wall upstairs where the new thermostat will be installed.
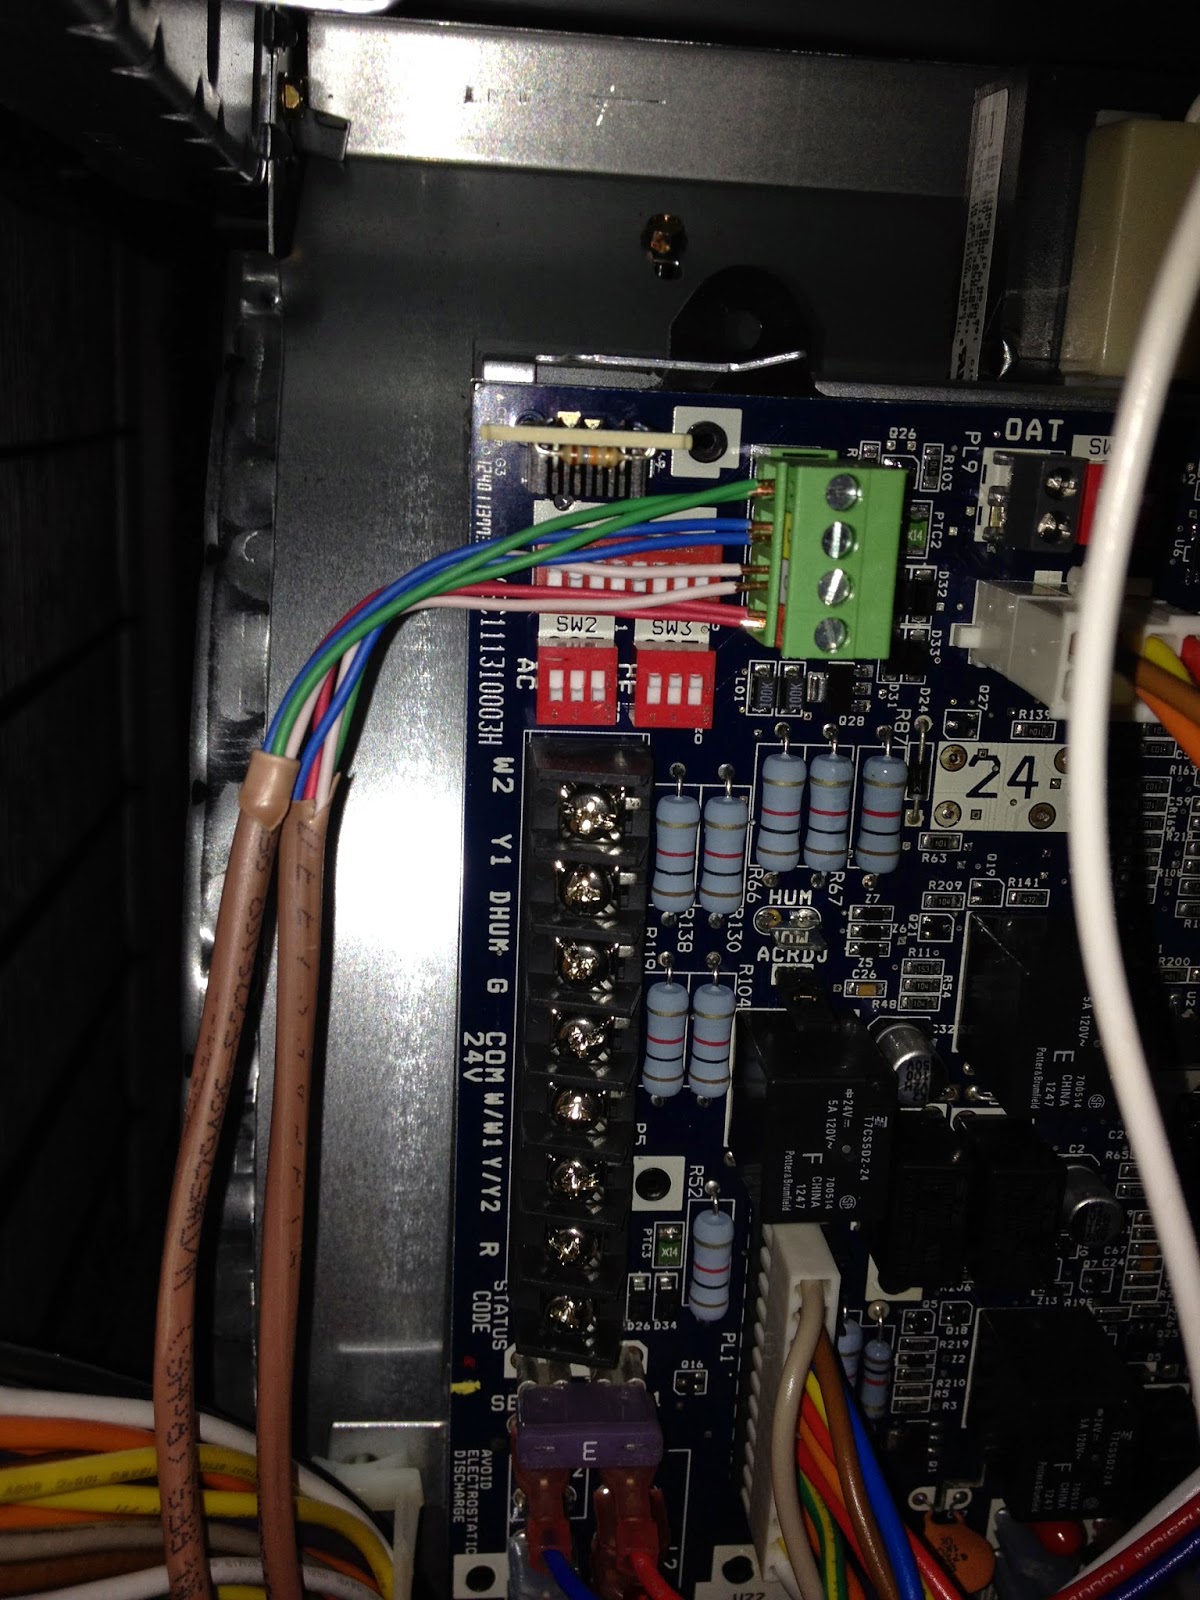
Step 3 - Connect the thermostat wire to the furnace

How to change my thermostat to a programmable thermostat Basically is is a matching the colors game. On the control board inside my furnace there are 4 slots for thermostat wire. Green, Yellow, White, Red. My thermostat wire had 4 colors (Green, Blue, White, Red). So I just matched up as many as possible and then place the blue in the yellow slot.

FYI - the color order really does not matter as long as you keep the same order throughout all the next steps...but of course it is easier if you just try to match the colors!!!...also most technicians will expect the colors to match what the system suggests.

Step 4 - Connect the thermostat wire to the AC

Sorry no pictures of the outside units control board...but it looks similar to the furnaces. the same colors, too. So you need to connect thermostat wire from the furnace to the AC - following the same color pattern. You can see in the above picture there are actually two blue wires, two green wires, etc. One set is coming from the controller to the furnace. The other set is going from the furnace to the AC. We ran the thermostat wire to the AC through the hole in the cinder block we made for the line set (discussed in Step #3 of the AC Installation entry).

Step 5 - Attached the back plate to the wall
Just make sure it is level and attach with a few screws. See picture in next step.

Step 6 - Connect the Thermostat Wire to the Controller
Just follow the same color pattern as in steps 3 & 4


Step 7 - Program your Controller
Every controller may have different programming steps. Some are more difficult than others. the Infinity Touch Controller does all the thinking for you. 

If you can answer simple questions like this:

How to change my thermostat to a programmable thermostat

...then you can program this controller to help your system maximize your home comfort and maximize your energy savings.

You are done with your new controller install.


Here is some more info on the various benefits of the Infinity Touch Controller...

The next 4 paragraphs are from the Carrier site because it kind of says it all...
"The control knows to conserve energy while you’re out and will turn back on at just the right time to create the perfect temperature for your return.

Because vacations cost enough money these days, let the Infinity System know how long you’ll be gone and it will make sure to save on energy costs.

Throughout the day the Infinity Touch control will intelligently react to changing outdoor temperatures and the conditions in the house to make sure you’re always getting peak efficiency and performance. Say, for hot summer days, you like to set your system to 78 degrees while you’re gone so you can save some energy but you always want it to be back at 72 when you return. The system will figure out if easing back to 74 instead will save you more energy and money and do just that. We call that a dynamic, self-determined “away” temperature control. Smart, huh?

The control will communicate to you, too. It’ll let you know when your air filter needs replacing or if service is needed. If you like, it can even communicate with your local Carrier® expert and tell him what needs attention."
...back to my commentary...

The Main Screen 
Gives you the date, time, room temperature and current days forecast (note only the WiFi version has weather forecast capabilities).

How to change my thermostat to a programmable thermostat - Infinity Touch Controller


Matches Any Decor
Note the white face plate - the box also comes with a silver plate and a black plate. It can match any decor.


The Settings Screen
The next screen allows you to easily adjust any settings with one touch. These adjustments would be temporary and then will return to your programmed settings after the desired time you select.

How to change my thermostat to a programmable thermostat - Infinity Touch Controller

The Menu Screen
  • Profiles - you set your desired temperatures for when you are Home, Wake, Sleep, Away
  • Schedules - You can set all your schedules here. Whether you want the same settings for all 7 days in a week or a different setting for each day...the controller will ask you series of simple questions that will guide you to your perfect settings.
  • Vacation settings - you can pre-program the exact days you will be away on vacation so you do not waste energy heating and cooling.
  • Energy Tracking - You can enter your Price per Kilowatt and Price per Therm. Then the controller will track how much you are spending per day.
  • Display - you can set up your Screen Saver settings - see the very last picture
This one control can manage temperatures, humidity, ventilation, airflow, indoor air quality and up to eight zones.

FYI - I set up all my profiles, schedules, vacations, energy rates, connected to my WiFi - the whole shebang - in about 30 minutes...you know...probably less time than it takes to read this entry! ;-)   ....without opening the Instruction Booklet....just press the buttons and follow the on screen prompts...it was fun!...yes I am a bit tech-geeky!

How to change my thermostat to a programmable thermostat - Infinity Touch Controller

The Weather Forecast
Even quicker then my iPhone ap - just press the today's weather portion on the Main Screen (see above picture) to get the next 5 days Forecast...again only if WiFi equipped...but really - if you are going to go all out with a state-of-the-art energy saving system - then get the WiFi version too!

The nice part is - with the weather (WiFi) option - the system will take the outside weather into consideration when determining how to run most efficiently. Re-dic-u-lous!

How to change my thermostat to a programmable thermostat - Infinity Touch Controller


There's an Ap for That!

No shocker here - of course there is an ap! Everything has an ap these days. 

With the MyInfinity Ap - I can control my "thermostat" from my iPhone, iPad, home laptop, work desktop...from anywhere.

The nice thing about the ap...ALL the screens look exactly the same as the main controller's screens. Learn one. You learned them all.

Here are 4 random screens from my iPhone Ap:


The best part...say Karen and I are watching a show and she says she is warm. I just whip out my phone and adjust the temperature. I never have to leave the sofa. Couch Potatoes Unite!

No seriously I have used the ap many times. I love it!

Screen Saver
As if all of this was not cool (pun intended) enough...you can also upload your own personal Screen Saver

So now instead of staring at the temperature...I have another spot I get to see my 3 little cuties:

Best. Picture. Ever.