Old House Restoration

A real family makes an old house their home...for the 2nd time
The Splendido's renovate, restore and rejuvenate their home with their own hands - all while living in the house
and balancing their family needs...you know...like most families have to do it!

Showing posts with label Restoring Wood Floors. Show all posts

Thursday, January 22, 2015

Kitchen Renovation #1 - Refinishing the Kitchen Floor - Before & After

Just before Christmas Karen and I decided it was time to get to work on the kitchen again. A spring and summer chocked full of outside projects and fall clean-ups left little time for indoor work - so the kitchen had not been touched since last March - when I started building the slate patio.

Refinishing Wood Floors - Wide Plank Pine - Restoring
Before
Since we were hosting Christmas, I figured we would do the kitchen floor in two steps - 1) Removal of the old floor and under lineament and 2) Refinish the pine wide-plank boards that we hoped would be worthy of refinishing!

I also chose the floors - because being Christmas time - I needed a project that did not cost too much. This project is mostly labor - so basically free (Step 1 cost $0....but don't tell that to my back!)

The picture to the above right is my Before - a reminder of what the floor looked like originally (it so needed to go!) 

Refinishing Wood Floors - Wide Plank Pine - Restoring
Half-Way Through
This next picture is how the floors looked after a weekend of hell. I already wrote about how I ripped out the old linoleum and removed the horrible black tar in this previous entry. I did this work just in time for our holiday guests.

Refinishing Wide-Plank Pine Wood Floors - The Rustic Way

Step 1 - Remove everything that is not bolted down

As with most my projects - Lily (My Little Helper) was right by my side. The first step was to remove the refrigerator and stove from the kitchen. The only way to get the frig out was to take all the doors off.  Just goes to prove even the easiest tasks will expand. I was hoping to just wheel everything out - but instead spent the next 90 minutes removing every door - on both the frig and in the kitchen and breakfast nook. it was the only way to get it out of the kitchen and to its temporary home.

Lily was disgusted by what she found when we emptied the frig. She got right to work on cleaning everything 'good as new.'


Once a apart and cleaned I used a furniture dolly (hand truck) to get the frig out and over to the phone nook in our entry hall.

We then had to put it back together, plug it in and fill her up again.
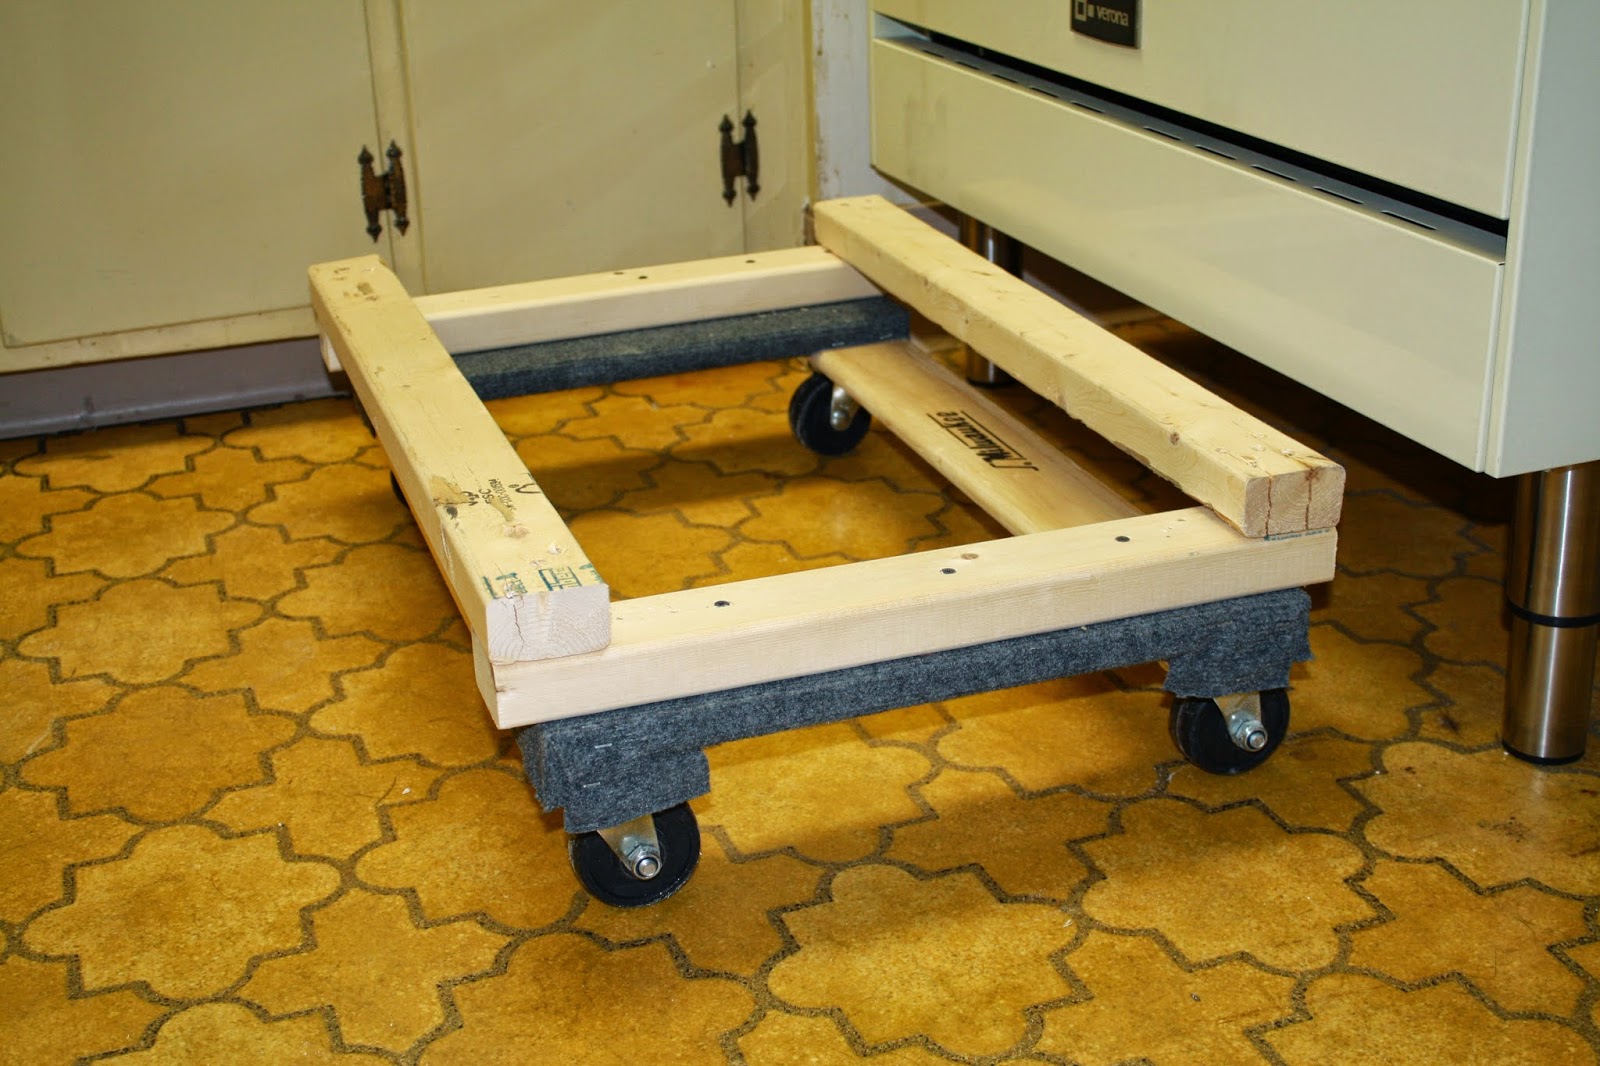
Stove Dolly - Oven DollyNext I rolled the stove out of the kitchen on the handy-dandy dolly I made for it. I am actually kind of proud of this one.

I took a regular wooden dolly and cut it down just enough to fit between the legs on our stove. Then I built up the sides with 2x3's until they just fit under the stove.


Stove Dolly - Oven Dolly
Notice the legs are off the floor
I then rolled the dolly under the stove and turned each of the legs to raise them off the floor and let the stove rest on the 2x3 supports. Now the stove could easily be rolled out of the way (while I paint, rip up floors, refinish floors, etc). Truth be known, the stove has actually been like this for 10 months now.

Best of all - when we are not doing work - the stove is still fully functional. It has made it much easier than trying to lift this beast every time I need to move it.


We rolled the stove into the dining room for temporary storage.

The stove in the Dining Room nook
Step 2 - Set up a Temporary Kitchen

Karen set up our temporary cooking (and even more importantly - coffee!) station in the dining room.


She also emptied the pantry onto temporary shelves in the dining room.


Step 3 - Take Measurements

Technically this should be done earlier in the process (like before you buy your wood conditioner, stain and polyurethane)...but at least I did it before I started staining...then I went out and bought some more of each (while I was renting a sander) - so st least it was not a wasted/extra trip.

Common Core anyone???
Step 4 - Tape all cabinet seams

I thought this would be a dusty job - so I taped all the seams shut. Turns out the machine had a GREAT vacuum system - dust was minimal.

Step 5 - Rent a Sander

Refinishing Wood Floors - Wide Plank Pine - Restoring
When I did the floor of the Breakfast Nook - I used my handheld rotary sander. I broke one. Spent another $50 for a new one.

This time the project was more than 2x's the square footage so I decided to break down and rent a real floor sander. I have never felt so stupid, Lowe's rents this monster for $40 per day (less than the cost of my new sander). I also had to buy $20 worth of sanding disks. It made quick and easy work of the floors....and there was almost no dust!...much different than last time...I felt like I was in Sahara sand storm when I did the floors with my hand sander. Learn from my mistake. It is night and day. Rent the correct tool for the job!

Refinishing Wood Floors - Wide Plank Pine - RestoringRefinishing Wood Floors - Wide Plank Pine - Restoring

Step 6 - Sand the Corners

Refinishing Wood Floors - Wide Plank Pine - RestoringI had to pull out the shop vac, handheld sanders and plain old sheets of sandpaper to get all the corners and under the cabinet lips. Learning from the dusty fiasco I had last time - I purchased an adapter that connected my sander to the shop vac. You can see it attached to the back of the yellow sander in the photo to the right. Big difference!


Here is a picture after all the sanding was done:

Refinishing Wood Floors - Wide Plank Pine - Restoring

All-in-all - it only took 2.5 hours of actual working time (not including trips to the store, etc.) to get to this point. Quick enough that I figured I could start staining that same afternoon!


Step 7 - Pre-Treat, Stain and Polyurethane

Staining Process
    • Apply a pre-stain conditioner - especially if you are staining a soft wood.
    • Apply your stain according to directions. Stains get wiped off after waiting a few minutes. PolyStains do not get wiped off.
    • Wait for the stain to dry.
    • Apply a second coat if you want a deeper color  (I went with one coat)
    • Apply polyurethane according to directions - I used a lambs wool applicator
    • After it dries lightly sand with a very fine sandpaper
    • Wipe off sanding dust with tack cloth
    • Apply 2nd and 3rd coats of poly following the same steps. Do not sand after your final coat.
Step 7A) All wood - but especially soft woods (pine, maple, etc) should have a pre-stain conditioner applied to make sure you do not have any blotching when you stain. Of course - that applies to new, perfect wood - the pre-stain may helping blotching - but it really highlights every imperfection in our rustic wood!!!! No worries - I have seen this before.

Refinishing Wood Floors - Wide Plank Pine - Restoring
The Pre-Stain Conditioner - really brings out the imperfections!!!!
Step 7B) Based on the success of the Breakfast Nook - I used the same stain - Minwax Polyshades in Mission Oak Satin. It is a stain and polyurethane in one. It is not intended for floors...but since when do you have to listen to directions, right?! Since this is a poly - you do NOT wipe it off. You apply it and let it dry. As you can see here - it dried to a very uneven finish (it was soaked up by the floors)...but that was expected. All I cared about was the color. It is exactly what we wanted. The dark color hides the imperfections much better than a light stain - and add to it that you do not wipe this stain off - it really hides many of the 'bad' spots well.

Refinishing Wood Floors - Wide Plank Pine - Restoring
Uneven sheen and all - they are looking great!
Step 7C) As I mentioned above - the Polyshades are not recommended for floors. That is because the stain does not truly penetrate the wood like a traditional stain. It can rub off over time in high traffic areas if left on its own. However - I called MinWax - yes I am that guy - and asked, "but what if I then applied 3 coats of real polyurethane over the polyshades? Would it then withstand the rigors of foot traffic?" They said - yeah that should work. Also - the polyurethane gave the floor a nice and even satin finish.

Don't forget to sand between coats!!! I sanded the polyshade lightly before the first coat of polyurethane and then again in-between each coat of poly. You must, must, must sand the floor very lightly with fine (I used 220 grit) sand paper. It will leave a white dust that you then vacuum and get up with a tack cloth. This sanding is imperative if you want a nice smooth finish after your final coat. Speaking of the final coat - do NOT sand after your final coat.

Refinishing Wood Floors - Wide Plank Pine - Restoring

If you look closely you can see the white dust
Hint: One more additional hint when applying polyurethane - cover your vents - so that they do not spit any dust or hair onto your floors while they are drying. Since this one vent was the only source of heat in the kitchen on a very cold day - I did not block the vent with cardboard - I tape a light weight rag (think cheap undershirt material) over the vent. It acted like a filter. It blocked particles, but let some heat through.


The Products:

Here are the products I used to get the finish we desired.

Refinishing Wood Floors - Wide Plank Pine - Restoring

If you can handle the back-breaking and PITA task of removing the linoleum, sub-floor and black tar - the actual refinishing is not all that strenuous.  Also since most of the job is labor - this restoration is relatively inexpensive (I spent approximately $150 on materials and rentals) - especially when you consider the dollar per impact factor (i.e. -  low cost, high wow factor).

The After Pictures

The floors came out bea-u-ti-ful.

Refinishing Wood Floors - Wide Plank Pine - Restoring

Refinishing Wood Floors - Wide Plank Pine - Restoring

Refinishing Wood Floors - Wide Plank Pine - Restoring

Not bad for a weekend's work:

  • Lily and I started Friday night by removing everything from the kitchen.
  • I sanded Saturday morning.
  • Pre-stain and Polyshade Saturday afternoon
  • 1st Coat polyurethane Sunday morning
  • Trip to the Albany Institute of History & Art Museum Sunday afternoon - My response to: "what are we doing that is fun today?"...plus Paige is studying Egypt in school and they have a real mummy on display!
  • 2nd coat of poly Sunday at 6pm
  • 3rd coat of poly Monday morning at 5am before work 
    • ....Hi my name is John and I am just a tad compulsive

Now to start tackling those hideous cabinets!
Stay tuned...

Tuesday, December 23, 2014

Here we go again!...the race before Christmas

Removing Linoleum - Scraping Up Linoleum - Restoring Wood FloorsThe kitchen and breakfast nook shared the exact same floor...which meant both floors were hideous! I finished the breakfast nook floors back in February!...but then turned my attention to the slate patio, so I never got around to the kitchen floor.

Karen has been pining for us to get started on the kitchen for months, but it just never worked out. There were many winter preparation projects and so many fall clean ups...6 fall cleanups - every weekend for 6 weeks! So it is safe to say she was very quick to notice that the snow that hit Niskayuna in early December covered any remaining leaves. I think she said in one breath "Too bad the yard is covered in snow so you can't work in the yard. Let's start the kitchen."

Removing Linoleum - Scraping Up Linoleum - Restoring Wood Floors


So on December 6th I started ripping up the linoleum, felt, plywood and more felt and black tar. 19 days until Christmas...doable...however we were hosting our 1st Christmas with Nanny on December 13th...added little more pressure.

The process was all too familiar for me. This would be my 3rd time dealing with this back breaking task. Once at the old house, then the breakfast nook at this house and now. The only thing - this floor is twice the square footage of those previous projects! However if we wanted the original wide plank pine floors (a Paul Schaefer staple) I knew what I had to do! My only saving grace was I already knew the exact process I had to use. Back in February I wasted a day trying a large assortment of chemicals to remove the black tar - all for naught. Turned out all that was needed was hot water and a 2 inch scraper and a lot of elbow grease.

Removing Linoleum - Scraping Up Linoleum - Restoring Wood Floors - Ripping Up Linoleum

Here you can see a tiny piece of my motivation
A small portion of the re-finished breakfast nook floors


Restoring Your Wood Floors

Step 1 - Remove the Linoleum

Removing Linoleum - Scraping Up Linoleum - Restoring Wood Floors - Ripping Up LinoleumThe linoleum removed pretty easily with a heavy duty floor clean up scraper. I just repeatedly slammed that in between the linoleum and the plywood and peeled up the linoleum. I kept the kids out of the room and work with a mask.


Removing Linoleum - Scraping Up Linoleum - Restoring Wood Floors - Ripping Up Linoleum - Removing Black Tar from Wood Floors
At the end of the first evening (2 hours of work) I covered everything with some drop cloths (old curtains) for the evening - after all I had to go to Craft Night at Hillside Elementary.


The next morning I got to work nice and early. First removing the rest of the linoleum

Removing Linoleum - Scraping Up Linoleum - Restoring Wood Floors - Ripping Up Linoleum - Removing Black Tar from Wood Floors

Step 2 - Remove the Plywood

Removing Linoleum - Scraping Up Linoleum - Restoring Wood Floors - Ripping Up Linoleum - Removing Black Tar from Wood FloorsGloves and a face mask and knee pads are a must. A mixture of hammers, screwdrivers, crowbars, floors scrapers and good ole brute force were able to remove the plywood, felt and any remaining nails. So many nails!


Removing Linoleum - Scraping Up Linoleum - Restoring Wood Floors - Ripping Up Linoleum - Removing Black Tar from Wood Floors


Removing Linoleum - Scraping Up Linoleum - Restoring Wood Floors - Ripping Up Linoleum - Removing Black Tar from Wood Floors
By the end of Saturday I had removed all the plywood and nails. I covered the floors with drop cloths again for the evening. So far it was 10 hours of total work to get this far. Not Pictured - me laying on the floor (multiple times) waiting for my back to let me get up and start working again. This is very back breaking work!


Step 3 - Removing the Tar Paper

Sunday was a new day. I woke up real early and start boiling water in our biggest pot and the tea kettle at the same time. I would repeat this at least 10 times this day.

Hot Water Method of Removing Tar Paper
  • Boil water in the tea kettle/pot
  • Pour scolding hot water in a 5 gallon pail
  • Dip 4 old beach towels into pail
  • Pick up a towel (with thick rubber gloves - they are hot!)
  • Let excess water drip back into pail
  • Lay towels over the floors in a single layer
  • Wait 15 minutes
  • Pick up the towels
  • Scape the floor boards with a 2 inch paint scraper
  • Repeat above steps 2 more times until most of the tar is gone.

Removing Linoleum - Scraping Up Linoleum - Restoring Wood Floors - Ripping Up Linoleum - Removing Black Tar from Wood Floors
Using this method is tedious, you are on your hands and knees for hours, back breaking, wet, dirty, sloppy, gooey work. Sounds fun right?!

 Left - A pail full of muck!


Removing Linoleum - Scraping Up Linoleum - Restoring Wood Floors - Ripping Up Linoleum - Removing Black Tar from Wood Floors


Removing Linoleum - Scraping Up Linoleum - Restoring Wood Floors - Ripping Up Linoleum - Removing Black Tar from Wood Floors


Above - some of the tools of the trade

Left - hot wet towels doing their thing


Removing Linoleum - Scraping Up Linoleum - Restoring Wood Floors - Ripping Up Linoleum - Removing Black Tar from Wood Floors
Slowly but surely I am making progress


Of course no project would be complete if I didn't get some (or a lot) of help from My Little Helper, Lily.

Removing Linoleum - Scraping Up Linoleum - Restoring Wood Floors - Ripping Up Linoleum - Removing Black Tar from Wood Floors
 Lily spraying hot water into the pantry.

By early afternoon on Sunday I had worked 18 hours in less than 48 hours. I had to stop without doing beneath the stove and the refrigerator to bring the kids to MiSci to see the holiday trains - after-all giving a satisfactory answer to "what are we doing that is fun today?" always trumps finishing a project. I worked on those remaining areas on Wednesday for another 4 hours. In total - 22 hours of being on my hands and knees ripping, scraping, sweating and aching, but it was worth it...

Here is the Semi-Finished Product...

Removing Linoleum - Scraping Up Linoleum - Restoring Wood Floors - Ripping Up Linoleum - Removing Black Tar from Wood Floors

....sanding and staining and refinishing will have to wait until after Christmas...because now it is all about making the house pretty, being merry with family and friends and enjoying time with Karen and my three little crazies.


"Cotton Headed Ninny Muggins" - Buddy the Elf


From crazy and silly to picture perfect sweeties in a blink of the eye!

Merry Christmas, Happy Holidays & Happy New Year!

Thursday, May 22, 2014

This Old House Contest - Breakfast Nook Bench & Butler's Pantry

I watch and read This Old House (and Ask This Old House) every chance I get. I dvr the episodes and watch them during any down time to get inspiration and to get the nerve to make a change!

I don't usually enter the contests, but it was a rainy Saturday morning and I couldn't work outside (yet), so I was surfing the web. One of my favorites is ThisOldHouse.com. I was just clicking away and saw the contest link. I figured the kids are still asleep and it is raining...so what the heck.

Link to Entry
I decided to enter The Breakfast Nook Bench in their Woodworking category. The website said it received my entry and they would post it after the editors have had an opportunity to review my entry. Today they posted my entry on their website! Whether I win or not, I got to admit it was fun to see my handy-work on their website! If you get a chance - visit this link to rate my entry. It is called Bench for Breakfast Nook - John S. Niskayuna, NY.

A little added enticement to visit the above link is I have yet to reveal the finished product on this blog yet, so you will get a sneak peek at The Butler's Pantry and Breakfast Nook Bench.


I believe there is also a chance that some of the entries may appear in a Fall issue of This Old House. Now that would be really cool! ***fingers crossed***

Sunday, May 18, 2014

Are there wood floors under there?...Breakfast Nook Floor - Before & After


removing linoleum floors - restoring wood floors
Original linoleum and some wallpaper remnants
After finishing the patio, I have taken a well deserved break from projects this past week. Therefore, I'll go back to a past project- the Breakfast Nook/Butler's Pantry posts. The first entry showed the Moravian Light I brought back from the dead and converted into a pendent light. The next item I tackled was the butler's pantry itself, but since you can see the wood floors in the after pictures - I will write about how I restored the wood floors instead. This means I have to go out of chronological order (which if you share my Type A personality - you know it is driving me crazy...but I have to do it).

The kitchen and breakfast nook share the exact same floor...which is not good for either of them! The kitchen floor is over 2 times larger than the nook, so I figured I would use the nook as my practice floor. Actually the whole nook restoration is a practice run for the kitchen, because almost the exact same changes need to happen in both - just in a larger scale.

removing linoleum floors - restoring wood floorsWhen we first walked through the house the obligatory home buyer question was asked "Do you think there are wood floors under there?" Extremely dirty looking and permanently stained - it is safe to say the floors were in rough shape - even before Karen started chipping away at various areas to get the answer to our question. Her archaeological digs (those first few days in our new house!) determined there were wide plank pine floors under the layers of linoleum, felt, plywood and tar paper. In the picture to the left you can see her handy work at the corner of the swinging door. She also did a larger area hidden underneath the runner (to protect us from splinters) at the top of the picture. We lived with these areas for 6+ months until I started this project in January.

Her work was not for naught. The rest of our house has very nice oak wood floors, but Paul Schaefer was known for his use of wide plank floors...so we were excited to see the wide planks, knowing we could bring back some authenticity. Even so I was honestly not looking forward to the job at all. I did a similar process at the old house and it was no fun at all. When it comes to getting that tar paper off the floor there are two schools of thought:
  1. Sand it off - using a new sanding disk every square foot or so (the tar fills in the grit making the sandpaper useless real fast)
  2. Use hot water and a hand scraper and get ready to get mucky!...this is the way I go....if anyone else has used the sanding method with success please let me know!!!
Restoring Your Wood Floors

Step 1 - Remove the Linoleum

No pictures, but the linoleum removed pretty easily with a heavy duty floor clean up scraper. I just repeatedly slammed that in between the linoleum and the plywood and peeled up the linoleum.

Step 2 - Remove the Plywood

removing linoleum floors - How to restore wood floors
removing the plywood revealed the tar paper
Gloves and a face mask a must. My knee pads would have been nice, too. A mixture of hammers, screwdrivers, crowbars, floors scrapers and good ole brute force were able to remove the plywood, felt and any remaining nails. So many nails!

removing linoleum floors - How to restore wood floors
Use any means possible to get the old stuff up


Step 3 - Removing the Tar Paper

Tar Paper/Tar stuck to the beautiful wood - how sad
After 75+ years the tar figured it had squatter's rights to the pine boards. For some silly reason I thought I would try various "products" you can get at the hardware store to make this process easier. I'll save you some time and a lot of effort...don't try any of them. None of them help. I returned them all for a refund. By the end of day one - I was shot. My back was killing. I decided to stop and that Sunday would be another day. I would go back to my tried and true hot water method.

Hot Water Method of Removing Tar Paper
  • Boil water in the tea kettle
  • Pour scolding hot water in a 5 gallon pail
  • Dip 4 old beach towels into pail
  • Pick up a towel (with thick rubber gloves - they are hot!)
  • Let excess water drip back into pail
  • Lay towels over the floors in a single layer
  • Wait 15 minutes
  • Pick up the towels
  • Scape the floor boards with a 2 inch paint scraper
  • Repeat above steps 2 more times until most of the tar is gone.
Using this method is tedious, you are on your hands and knees for hours, back breaking, wet, dirty, sloppy, gooey work. Sounds fun right?! (Seeing the mess I was making, I did here the kids say, "how come you get all the fun."...really!?) When it is all said and done, I probably touched every inch of wood on that floor 8-12 times...2 inches at a time! I really may need to revisit the sanding option for the bigger kitchen floor.

Funny thing is after all that hard work you are left with a floor that is tar free but does not look very nice (see above). But don't fret. They will still look great when you are done. Keep reading on!

Restoring wood floors
Imagine scraping every inch with this 8-12 times!

Step 4 - Sand the Floor


Restoring wood floors
After sanding - they are starting to look like something
All that water will raise the grain of the wood, plus the wood will have many uneven spots and little remnants of tar. So sanding is still necessary. I used a 5 inch orbital sander we have owned for 10 years. About half way through the sanding it broke...wood floors is not really its intended purpose. I did go out and buy another 5 inch orbital to finish the job (they are used on so many projects!). In my last post I mentioned how one of the benefits of doing your own work is being able to buy new tools...however, that same excitement does not exist when you are buying a new tool to replace the one you just broke.


Step 5 - Stain the Floor & Polyethylene

Start light - you can always go darker. That was Karen's and my mantra when it came to the floors. We thought about having light pine boards, but had an inkling based on past experience with restoring woods floors that had been abused by nails, tar and the like that we would eventually end up dark. We were never going for pristine. We wanted the rustic wood floors. Our house has an Adirondack rustic feel from the outside, so having non-perfect wide planks floors would fit in just right.

Light stain did not do the job...too uneven.
With that said, I first applied a pre-stain conditioner that is supposed to help even out the stains absorption into soft woods. Then I applied a light stain and decided we would live with it for a few days to see what we thought....my initial thought was - we are going dark. This light stain was way too uneven.

So then I went to my local Benjamin Moore dealer and talked to them about some ideas I had in my head. As with most stains, you apply the stain, wait a few minutes and then wipe off the stain. I was noticing as I started going darker, everything looked fine when applied, but once I wiped the stain off all the unevenness reappeared. So I had used a PolyShade product on my last kitchen. It is a polyurethane and stain all in one. The big difference here is you apply it and leave it to dry. So it covers imperfections better (uneven color, nail holes, etc). Our last kitchen's floor looked fantastic for 5 years or so, before we started getting wear spots at the heavy use areas (in front of the sink, etc.). This is because the PolyShade does not penetrate the wood. So over time it has the potential to wear out.

These are what I used
My idea this time, was even though the directions say All in One - I would still cover the whole floor with 3 additional coats of real polyurethane as if I had stained it. I talked with the folks at Benjamin Moore about whether my plan should give me the coverage I was looking for without getting wear patterns over the years and they assured me I was on to something. They suggested I go with a good Polyurethane. They said this brand (pictured right) is stronger than most. The only down side is it is only allowed to be sold in Quarts.They can sell me 4 quarts, but they are not allowed to sell a gallon. Nonsensical.

So with that, I applied the Mission Oak PolyShade and three coats of Satin poly with a Lambs Wool applicator (very important).

Staining Process
  • Apply a pre-stain conditioner - especially if you are staining a soft wood.
  • Apply your stain according to directions. Stains get wiped off after waiting a few minutes. PolyStains do not get wiped off.
  • Wait for the stain to dry.
  • Apply a second coat if you want a deeper color  (I went with one coat)
  • Apply polyurethane according to directions - I used a lambs wool applicator
  • After it dries lightly sand with a very fine sandpaper
  • Wipe off sanding dust with tack cloth
  • Apply 2nd and 3rd coats of poly following the same steps. Do not sand after your final coat.
If everything was done right you should end up with something like this! Better than I ever imagined!

Restoring wood floors

The floors still look great 3 months later (as they should). After some real life use they do look more satin than semi-gloss as the above picture suggests. We LOVE the floor!

The nice part is when restoring on a budget this project cost practically nothing!...as long as you do the work yourself.
  • Sanding disks for orbital sander - $5
  • PolyShade - $13
  • Poly - 2 quarts - $16
  • Lambs wool applicator - $8 (refills are cheaper if doing future jobs)
The best $42 you will ever spend!...of course I had to buy a new orbital, but that will be used for years to come.

It should go to show you no matter what your wood floors look, like they can be saved! Especially if you are willing to go a little rustic. A rustic real wood floor beats a new vinyl, linoleum or (most) laminates any day! Go for it!